|
The great Argentinian author Jorge Luis Borges once wrote, "Time is the substance from which I am made. Time is a
river which carries me along, but I am the river; it is a tiger that devours
me, but I am the tiger; it is a fire that consumes me, but I am the
fire." Bullet time: Bullet Time CGI: http://sentimentalfreak.deviantart.com/art/Matrix-Bullet-Time-thing-34182637 GoPro Low Cost Rig: http://www.cinema5d.com/recreating-the-bullet-time-effect-from-the-matrix-with-1-gopro/ http://en.wikipedia.org/wiki/Bullet_time https://www.youtube.com/watch?v=bKEcElcTUMk http://tvtropes.org/pmwiki/pmwiki.php/Main/BulletTime http://sabia.tic.udc.es/gc/Contenidos%20adicionales/trabajos/Peliculas/FX/ej3.html MIT professor Harold “Doc” Edgerton figured out how to marry a still camera and a strobe light that could flash up to 120 times a second, stopping time and allowing for the analysis of events too fast for the naked eye to see, like a bullet passing through an apple or a drop of milk splashing, crashes, explosions, moving water, anything moving http://deskarati.com/2013/09/07/harold-doc-edgerton/ The Moment of
Impact http://www.smashingapps.com/2010/01/17/40-stunning-examples-of-high-speed-photography.html http://9bytz.com/perfectly-timed-photographs-of-animals/ Femto
photography: http://web.media.mit.edu/~raskar/trillionfps/ Techniques: http://www.hiviz.com/about/about.htm
Great source of info to keep in mind from: Learning about
Exposure – The Exposure Triangle
In it Bryan
illustrates the three main elements that need to be considered when playing
around with exposure by calling them ‘the exposure triangle’. Each of the
three aspects of the triangle relate to light and how it enters and interacts
with the camera. The three
elements are:
It is at the
intersection of these three elements that an image’s exposure is worked out. Most
importantly – a change in one of the elements will impact the others. This
means that you can never really isolate just one of the elements alone but
always need to have the others in the back of your mind. 3 Metaphors for
understanding the digital photography exposure triangle: Many people
describe the relationship between ISO, Aperture and Shutter Speed using
different metaphors to help us get our heads around it. Let me share three. A
quick word of warning first though – like most metaphors – these are far from
perfect and are just for illustrative purposes: The Window Imagine your
camera is like a window with shutters that open and close. Aperture is the
size of the window. If it’s bigger more light gets through and the room is
brighter. Shutter Speed
is the amount of time that the shutters of the window are open. The longer
you leave them open the more that comes in. Now imagine
that you’re inside the room and are wearing sunglasses (hopefully this isn’t
too much of a stretch). Your eyes become desensitized to the light that comes
in (it’s like a low ISO). There are a
number of ways of increasing the amount of light in the room (or at least how
much it seems that there is. You could increase the time that the shutters
are open (decrease shutter speed), you could increase the size of the window
(increase aperture) or you could take off your sunglasses (make the ISO
larger). Ok – it’s not
the perfect illustration – but you get the idea.
Sunbaking Another way
that a friend recently shared with me is to think about digital camera
exposure as being like getting a sun tan. Now getting a
suntan is something I always wanted growing up – but unfortunately being very
fair skinned it was something that I never really achieved. All I did was get
burnt when I went out into the sun. In a sense your skin type is like an ISO
rating. Some people are more sensitive to the sun than others. Shutter speed
in this metaphor is like the length of time you spend out in the sun. The
longer you spend in the sun the increased chances of you getting a tan (of
course spending too long in the sun can mean being over exposed). Aperture is
like sunscreen which you apply to your skin. Sunscreen blocks the sun at
different rates depending upon it’s
strength. Apply a high strength sunscreen and you decrease the amount of
sunlight that gets through – and as a result even a person with highly
sensitive skin can spend more time in the sun (ie
decrease the Aperture and you can slow down shutter speed and/or decrease
ISO). As I’ve said –
neither metaphor is perfect but both illustrate the interconnectedness of
shutter speed, aperture and ISO on your digital camera. Update: A third
metaphor that I’ve heard used is the Garden Hose (the width of the hose is
aperture, the length that the hose is left on is shutter speed and the
pressure of the water (the speed it gets through) is ISO. ::::::::::::::::::::::::::::::::::::::::::::::::::::::::::::::::::::::::::::::::::::::::::::::::::::::::::: Aperture
Before I start
with the explanations let me say this. If you can master aperture you put
into your grasp real creative control over your camera. In my opinion –
aperture is where a lot of the magic happens in photography and as we’ll see
below, changes in it can mean the difference between one dimensional and multi dimensional shots. What is
Aperture? Put most simply – Aperture is ‘the size of the
opening in the lens when a picture is taken.’ When you hit
the shutter release button of your camera a hole opens up that allows your
cameras image sensor to catch a glimpse of the scene you’re wanting to
capture. The aperture that you set impacts the size of that hole. The larger
the hole the more light that gets in – the smaller
the hole the less light. Aperture is
measured in ‘f-stops’. You’ll often see them referred to here at Digital
Photography School as f/number – for example f/2.8, f/4, f/5.6,f/8,f/22 etc.
Moving from one f-stop to the next doubles or halves the size of the amount
of opening in your lens (and the amount of light getting through). Keep in
mind that a change in shutter speed from one stop to the next doubles or
halves the amount of light that gets in also – this means if you increase one
and decrease the other you let the same amount of light in – very handy to
keep in mind). One thing that
causes a lot of new photographers confusion is that
large apertures (where lots of light gets through) are given f/stop smaller
numbers and smaller apertures (where less light gets through) have larger
f-stop numbers. So f/2.8 is in fact a much larger aperture than f/22. It
seems the wrong way around when you first hear it but you’ll get the hang of
it.
Depth of Field
and Aperture There are a
number of results of changing the aperture of your shots that you’ll want to
keep in mind as you consider your setting but the most noticeable one will be
the depth of field that your shot will have. Depth of Field
(DOF) is that amount of your shot that will be in focus. Large depth of
field means that most of your image will be in focus whether it’s close
to your camera or far away (like the picture to the left where both the
foreground and background are largely in focus – taken with an aperture of
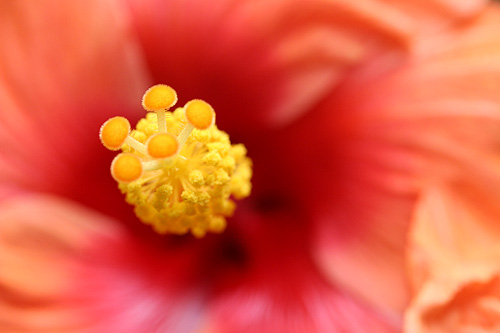
f/22). Small (or
shallow) depth of field means that only part of the image will be in focus
and the rest will be fuzzy (like in the flower at the top of this post (click
to enlarge). You’ll see in it that the tip of the yellow stems are in focus
but even though they are only 1cm or so behind them that the petals are out
of focus. This is a very shallow depth of field and was taken with an aperture
of f/4.5). Aperture has a
big impact upon depth of field. Large aperture (remember it’s a smaller
number) will decrease depth of field while small aperture (larger numbers)
will give you larger depth of field. It can be a
little confusing at first but the way I remember it is that small numbers
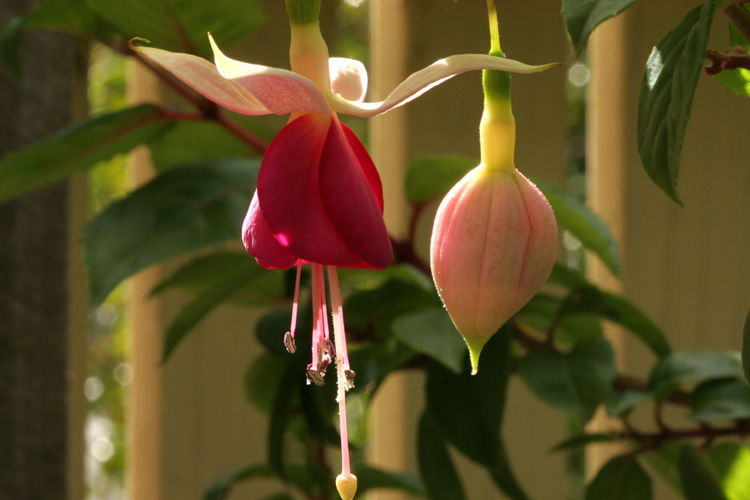
mean small DOF and large numbers mean large DOF. Let me
illustrate this with two pictures I took earlier this week in my garden of
two flowers.
The f/2.8 shot
(2nd one) has the left flower in focus (or parts of it) but the depth of
field is very shallow and the background is thrown out of focus and the bud
to the right of the flower is also less in focus due to it being slightly
further away from the camera when the shot was taken. The best way to
get your head around aperture is to get your camera out and do some experimenting.
Go outside and find a spot where you’ve got items close to you as well as far
away and take a series of shots with different aperture settings from the
smallest setting to the largest. You’ll quickly see the impact that it can
have and the usefulness of being able to control aperture. Some styles of
photography require large depths of field (and small Apertures) For example in
most landscape photography you’ll see small aperture settings (large numbers)
selected by photographers. This ensures that from the foreground to the
horizon is relatively in focus. On the other
hand in portrait photography it can be very handy to have your subject
perfectly in focus but to have a nice blurry background in order to ensure
that your subject is the main focal point and that other elements in the shot
are not distracting. In this case you’d choose a large aperture (small
number) to ensure a shallow depth of field. Macro
photographers tend to be big users of large apertures to ensure that the
element of their subject that they are focusing in on totally captures the
attention of the viewer of their images while the rest of the image is
completely thrown out of focus. Read more: http://digital-photography-school.com/aperture#ixzz2MSOfQo2W ::::::::::::::::::::::::::::::::::::::::::::::::::::::::::::::::::::::::::::::::::::::::::::::::::::::::::: What is Shutter
Speed? As I’ve written
elsewhere, defined most basically – shutter speed is ‘the amount of time
that the shutter is open’. In film
photography it was the length of time that the film was exposed to the scene
you’re photographing and similarly in digital photography shutter speed is
the length of time that your image sensor ‘sees’ the scene you’re attempting
to capture. Let me attempt
to break down the topic of “Shutter Speed” into some bite sized pieces that
should help digital camera owners trying to get their head around shutter
speed:
• Shutter speed is measured in
seconds – or in most cases fractions of seconds. The bigger the denominator
the faster the speed (ie 1/1000 is much faster than
1/30). • In most cases you’ll probably be
using shutter speeds of 1/60th of a second or faster. This is because
anything slower than this is very difficult to use without getting camera
shake. Camera shake is when your camera is moving while the shutter is open
and results in blur in your photos. • If you’re using a slow shutter
speed (anything slower than 1/60) you will need to either use a tripod or
some type of image stabilization (more and more cameras are coming with this
built in). • Shutter speeds available to you
on your camera will usually double (approximately) with each setting. As a result
you’ll usually have the options for the following shutter speeds – 1/500,
1/250, 1/125, 1/60, 1/30, 1/15, 1/8 etc. This ‘doubling’ is handy to keep in
mind as aperture settings also double the amount of light that is let in – as
a result increasing shutter speed by one stop and decreasing aperture by one
stop should give you similar exposure levels (but we’ll talk more about this
in a future post). • Some cameras also give you the
option for very slow shutter speeds that are not fractions of seconds but are
measured in seconds (for example 1 second, 10 seconds, 30 seconds etc). These are used in very low light situations, when
you’re going after special effects and/or when you’re trying to capture a lot
of movement in a shot). Some cameras also give you the option to shoot in ‘B’
(or ‘Bulb’) mode. Bulb mode lets you keep the shutter open for as long as you
hold it down. • When considering what shutter
speed to use in an image you should always ask yourself whether anything in
your scene is moving and how you’d like to capture that movement. If there is
movement in your scene you have the choice of either freezing the movement
(so it looks still) or letting the moving object intentionally blur (giving
it a sense of movement). • To freeze movement in an image
(like in the surfing shot above) you’ll want to choose a faster shutter speed
and to let the movement blur you’ll want to choose a slower shutter speed.
The actual speeds you should choose will vary depending upon the speed of the
subject in your shot and how much you want it to be blurred.
• Motion is not always bad – I
spoke to one digital camera owner last week who told me that he always used
fast shutter speeds and couldn’t understand why anyone would want motion in
their images. There are times when motion is good. For example when you’re
taking a photo of a waterfall and want to show how fast the water is flowing,
or when you’re taking a shot of a racing car and want to give it a feeling of
speed, or when you’re taking a shot of a star scape and want to show how the
stars move over a longer period of time etc. In all of these instances
choosing a longer shutter speed will be the way to go. However in all of
these cases you need to use a tripod or you’ll run the risk of ruining the
shots by adding camera movement (a different type of blur than motion blur). • Focal Length and Shutter Speed -
another thing to consider when choosing shutter speed is the focal length of
the lens you’re using. Longer focal lengths will accentuate the amount of
camera shake you have and so you’ll need to choose a faster shutter speed
(unless you have image stabilization in your lens or camera). The ‘rule’ of
thumb to use with focal length in non-image stabilized situations) is to
choose a shutter speed with a denominator that is larger than the focal
length of the lens. For example if you have a lens that is 50mm 1/60th is
probably ok but if you have a 200mm lens you’ll probably want to shoot at
around 1/250. Shutter Speed –
Bringing it Together Remember that
thinking about Shutter Speed in isolation from the other two elements of the
Exposure Triangle (aperture and ISO) is not really a good idea. As you change
shutter speed you’ll need to change one or both of the other elements to
compensate for it. For example if
you speed up your shutter speed one stop (for example from 1/125th to
1/250th) you’re effectively letting half as much light into your camera. To
compensate for this you’ll probably need to increase your aperture one stop
(for example from f16 to f11). The other alternative would be to choose a
faster ISO rating (you might want to move from ISO 100 to ISO 400 for example). ::::::::::::::::::::::::::::::::::::::::::::::::::::::::::::::::::::::::::::::::::::::::::::::::::::::::::: Action shots Tv (Time value) shutter –priority on the mode dial Experiment: using a tripod take an image of a
moving event at various shutter speeds such as 1 second, 1/3, 1/30, 1/200,
1/800. Explore your results. What happens to the way movement appears in your
photographs? What happens to the background of your image? Shutter speed along with the aperture of the lens (also called
f-number) determines the amount of light that reaches the film or sensor.
Conventionally, the exposure is measured in units of exposure value (EV),
sometimes called stops, representing a halving or doubling of the exposure. Multiple combinations of shutter speed and aperture can give the
same exposure: halving the shutter speed doubles the exposure (1 EV more),
while doubling the aperture size (halving the focal number) increases the
exposure area by a factor of 4 (2 EV). For this reason, standard apertures
differ by √2, or about 1.4. Thus an exposure with a shutter speed of
1/250 s and f/8 is the same as with 1/500 s and f/5.6, or 1/125 s and f/11. For
Splashes of Water with objects dropped into water you can try
using a your camera in: Or try this one of High-speed Water Photography Tutorial
at https://www.youtube.com/watch?v=x43yftnFBBw Think in terms of capturing existing moving events or staging
moving events of your own… be creative, experiment and feel the motion
reflected in the image ! What is Panning? Slow shutter
speed combined with panning the camera can achieve a motion blur for moving
objects. Panning is the
horizontal movement of a camera as it scans a moving subject. And since
someone out there who’s mind is permanently blocked to technical jargon, as
mine is, there was bound to be a “huh?” or two. So let me break it down
a bit. When you pan
you’re moving your camera in synchronicity with your subject as it moves
parallel to you. Still a little wordy huh? It’s not as complicated as
it sounds. Shake your head “no.” Go on and do it. Now cut that in
half and pretend like you’re moving you head along with a cheetah as is it flies
by and you’ve got the idea. In order to pan successfully your camera has got
to follow the subject’s movement and match it’s
speed and direction as perfectly as possible. What’s it for? Proper panning
implies motion. However, panning creates the feeling of motion and speed
without blurring the subject as a slow shutter speed sans panning would tend
to do. Take for example the two images below. The first is an
example of panning. Notice how the car is clear and crisp but the rest
of the image is blurred to show the motion of the vehicle. This effect
was achieved by panning.
Image Credit: Blentley
Now check out
the second image. This is an example
of a slow shutter speed (which panning also requires by the way) without the
panning of the camera. Because the
camera was held static, the moving object, in this case the train, depicts
the motion while the area around it is static. Image Credit: Papalars Is one image
better than the other? Maybe, maybe
not, it’s certainly a matter of preference. Both static shots employing slow
shutter speeds and panning images have their place and time and it’s up to
you as the discerning photographer to decide which you’d like to employ in
any given situation. 5 Tips for Successful Panning 1. Panning requires a steady hand and a
relatively slow shutter speed. The actual
shutter speed depends on the speed of the subject but generally it will be
1/200th or slower. 1/200th if your subject is really flying along, like a
speeding car on a race track, and maybe as slow as 1/40th of a second if your
subject is a runner on a track. 2. Keep in mind that the faster your shutter
speed is the easier it will be to keep your subject crisp. Especially as
you’re learning the art of panning, don’t slow your shutter down too
much. Just keep it slow enough to
begin to show some motion. As your
confidence increases and you’ve got the hang of things, go ahead and slow
your shutter more and more to show even further pronounced motion and thus
separation of your speeding subject from the background. 3. Make sure your subject remains in the same
portion of the frame during the entire exposure: this will ensure a crisp, sharp subject. 4. Remember
that the faster your subject is moving the more difficult it will be to pan. This point goes
right along with number 3. It’s harder
to keep your subject in the same portion of the frame if it’s moving faster
than you are able to. So again, start
with something a little slower and then progress from there. 5. Have fun! and if
at first you don’t succeed, give up for sure.
Wait, er, try try
again. Trick for
beginners: Image Credit: Natalie Norton When I was trying to learn how to pan I
sincerely found it difficult to match my speed to that of my subject. I’d plant my feet firmly in the ground,
pull my elbows in tightly to my sides to avoid camera shake, wait wait wait for my subject and
then zoom right along with them. I was
having the most difficult time! I’d normally move faster than my subject
ending up with an image that was nothing short of a blurry mess. Then I had an idea. I took my son with one hand, held my camera
to my eye with the other, and spun him in a circle. WE WERE MOVING AT THE EXACT SAME SPEED BECAUSE WE WERE
CONNECTED! I felt like Albert
Einstein! Read more: http://digital-photography-school.com/the-art-of-panning#ixzz2MSYD9ox3 :::::::::::::::::::::::::::::::::::::::::::::::::::::::::::::::::::::::::::::::::::::::::::::::::: Sharon Harper http://photoarts.com/gallery/harper/intro.html |