HDR Tutorial -
Featuring HDR 2.0
I hope this tutorial on my evolving HDR
techniques proves useful to you! I receive a lot of emails from people who
stumble across my photography asking how I do this. Rather than sending a
super-long response, I made this little tutorial because I was feeling
particularly open-source one day. You can view some of the most
popular pictures by clicking here. Most of these are HDR.
http://stuckincustoms.com/2006/06/06/548/
Also, many of you come here for my
Photomatix Coupon Code - it is “StuckInCustoms” and here is the discount link.
What is HDR?
HDR is short for High Dynamic Range. It
is a software technique of taking either one image or a series of images,
combining them, and adjusting the contrast ratios to do things that are
virtually impossible with a single aperture and shutter speed.
I will post a few interesting HDR
photographs that I have taken that people seem to like.
I’m a huge defender and believer of
utilizing HDR as a technique for processing photos because I think it helps to
evoke my actual memory of the scene. It’s just another tool that digital
photographers can utilize depending on the situation. As opposed to the camera
shutter and aperture, the human eye actually scans the scene at a very high
rate of speed, constantly adjusting the pupil diameter to adjust the light and
color levels. The pre-frontal cortex builds a quilt-like image that is
comprised of millions of little bits, combined with neuron-connected memories
of colors of objects. For example, when you look at a sunset, you can see all
the colors of the clouds and sky, but you can also see all the colors of the
trees and rocks in the foreground. This is why, many times, people get home
after a vacation and sigh at their pictures and tell their friends, “Well, it
was much better when you were there.” So hey, it’s 2007, why not use software
and the built-in ability of your camera to make a beautiful rendition of what
YOU really saw? Some of us see life in HDR and some don’t… There’s a lot of
HDR-hatahs out there… just ignore them… Don’t hate the playa, hate the game… or
tell them to get back in their dark rooms with their smelly hands.
HDR Tutorial –
Multiple Exposures
The first part of the tutorial looks at HDRs from multiple exposures. The
second part deals with HDRs from a single RAW file.
The tutorial also discusses clouds and
this is really a detail of layer process. You can use this same technique not
just to accentuate clouds, but also petals on a flower, edges on a building,
etc.
Part 1 – Get your
Apple on (but it also works if you refuse to wear a black turtleneck and use an
Apple)
So here is a picture of my desktop
before I launch all of these apps and melt my CPU. Speaking of which, Macs are
great, and my Mac’s CPU does not melt - it handles all this stuff with reckless
aplomb. I used to hate Macs and hate Mac people, but I’m a changed man. These
things are great… Okay I digressed way to early in this tutorial.
What apps do you need? You can see down
there that I have the essentials: Photoshop, Photomatix, and Lightroom. You can
do without Lightroom, but if you are taking a lot of shots, it would behoove
you to organize them. Sure, the rest of your life is a disorganized mess, but
it doesn’t mean your photos have to be. I will of course talk more about these
apps below.
If you buy Photomatix, be sure
to use the discount coupon code “StuckInCustoms“, you’ll be set up. Hey,
it’s better than a sharp stick in the eye. This is the same thing the priest
said at my wedding.
As for a camera, any DSLR will do. I
use the tank of the Nikon D2X, but I’ve also taken many good HDRs with the D70.
It is important that the camera has auto-bracketing and can shoot in RAW mode.
Now that you have all your equipment
and software and black turtlenecks, we can move on to the photo itself.
Part 1 – Look at the
world in HDR
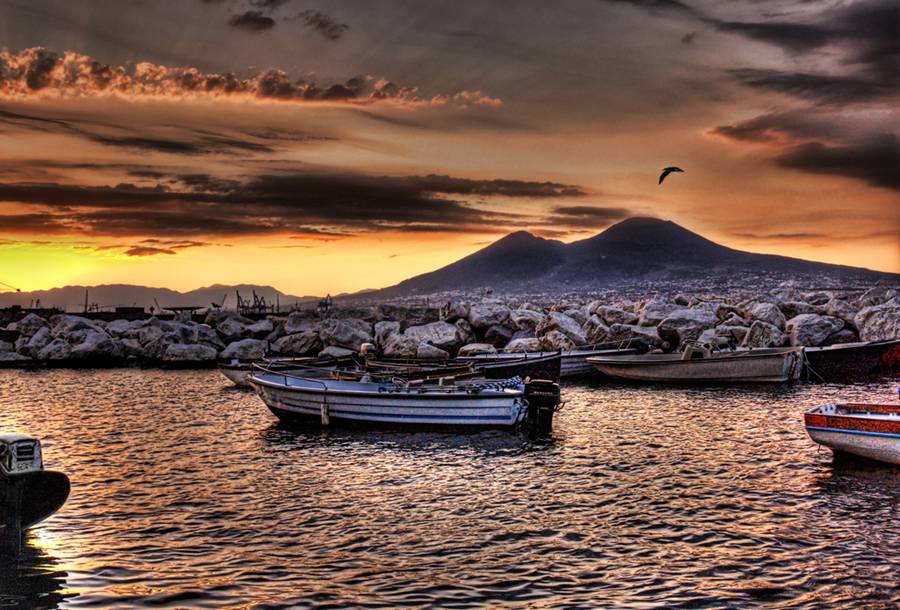
It is key to choose good HDR candidates. What I look for are extreme levels in
light in a given scene. Below is a selection of five photos that I shot in
Iceland in a picture I call “The Icy Pit to
Hell“. It is from a waterfall called Gullfoss, not too far from where
ancient theologians said was the entrance to hell, where properly sanctioned
Christians could travel to retrieve loved ones from Dante’s frozen sepulcher.
To achieve that final picture there are
a few steps, which I will detail here.
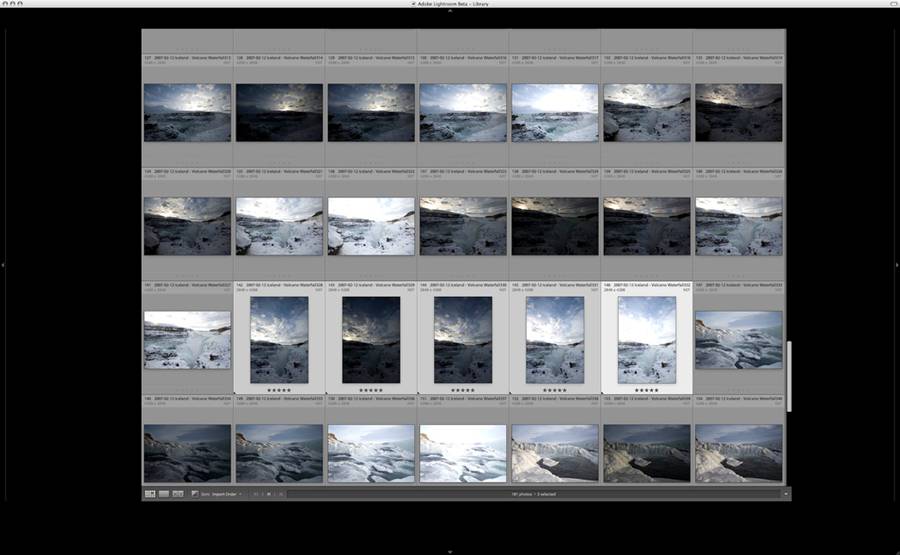
Below, in Adobe Lightroom, you can see
there are five pictures there. They were shot on a tripod with exposure
settings of -2, -1, 0, +1, and +2. I normally do five exposures in extreme
bright or extreme dark. The rest of the time, three exposures seems to work
fine.
For the picture below, I suggest you
look at the Original
Size to see the details.
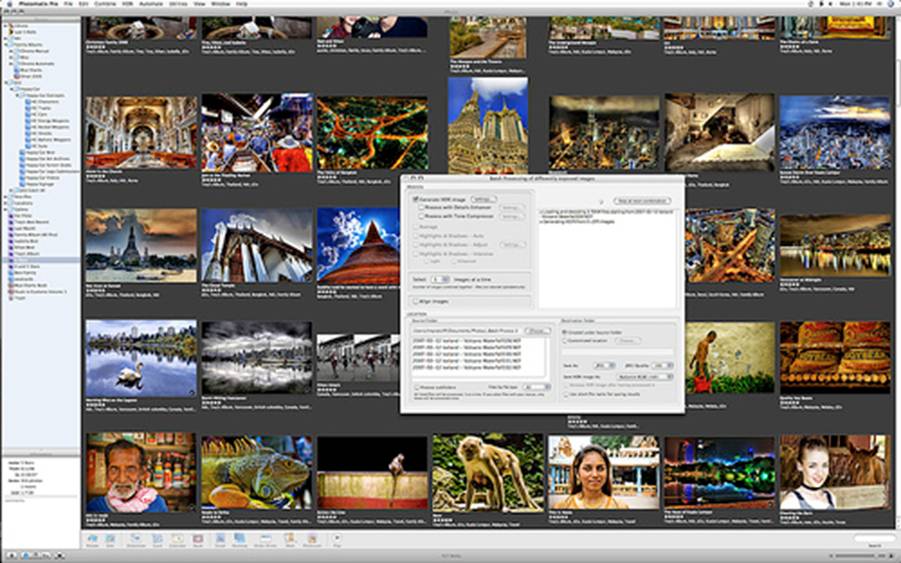
Now it is time to fire up Photomatix
and get crunk in the HDR house. Okay that was stupid.
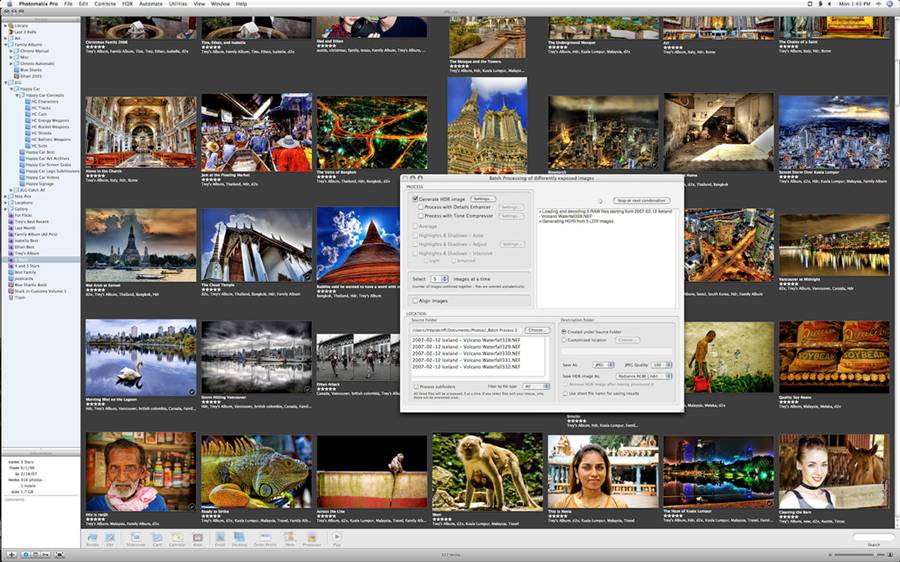
Below you can see the batch processing
in action. I prefer batch processing to the HDR > Generate menu option
because I usually process many sets at a time. You have to check off “Generate
HDR” at the top and also go into those “Settings…” and put in the exposure step
size. As I said above, I am using steps of 1. You also need to change the
number in the dropdown that corresponds to the number of exposures. In this
case, I chose 5.
Upon hitting “Run” in the upper right,
Photomatix will churn through the images and output a .HDR file that gets
buried in the same directory as the files.
The picture below can only be read in the
Original size. Feel free to ignore that iPhoto background - the Photomatix
window is all that matters here.
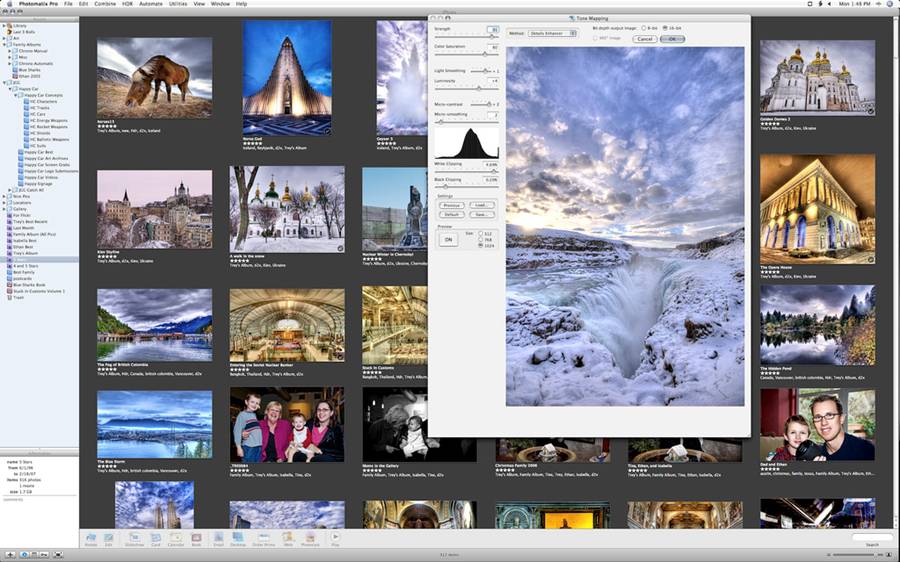
Now that we have the .HDR file, we need
to open that up inside Photomatix. I normally drag the HDR file to the
Photomatix icon. At that point, I go to HDR > Tone Mapping to adjust the
settings.
Every picture is different. There is no
“right way” to set these sliders. I talk more about slider settings below in my
second example. This one I did heavier saturation because the white/black was
so dominant that I wanted to bring out the blue of the sky.
Again, you can only see the text below
if you click
here to view the Original size.
After all the processing, you can see
the final result of this image here:
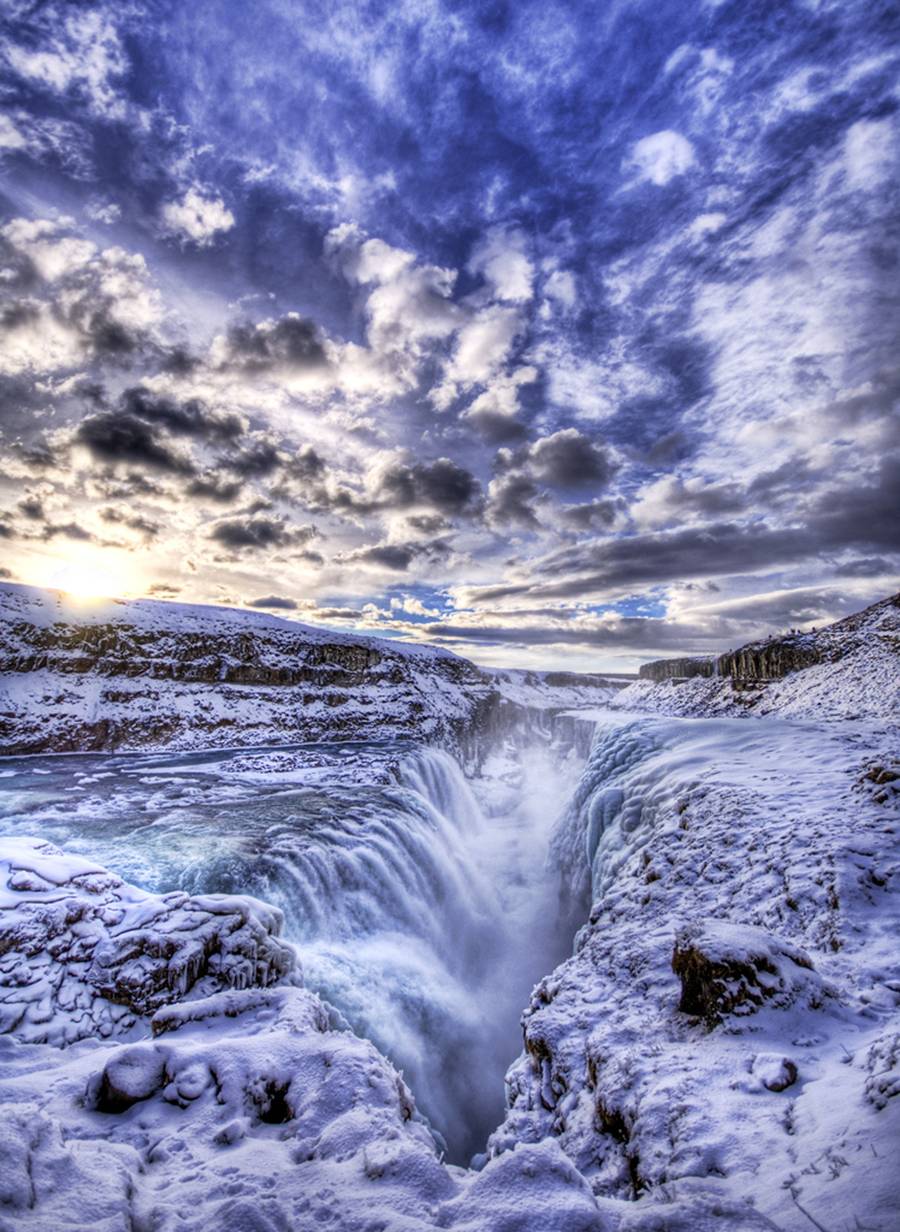
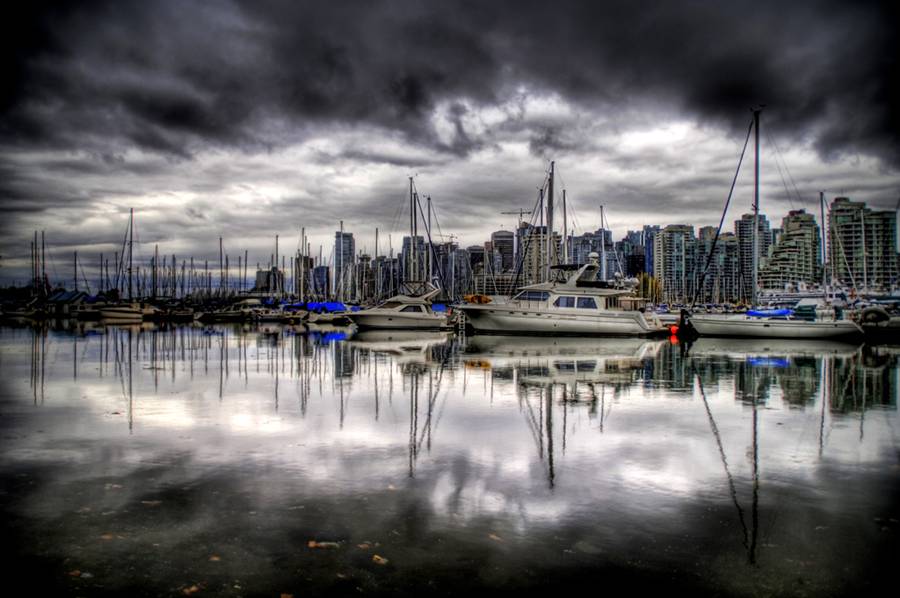
Multiple exposure HDRs can do amazing
things to pictures. These often need to be viewed in a bigger size so they can
fully be appreciated. My theory is that the pupil needs to literally move
around the picture in order for the brain to accept that there are multiple
light levels being viewed contemporaneously. Here are other examples that were
shot with either 3 or 5 exposures.

Part 3: Another
example (from Original Tutorial):
Here is the starting image… this is the
image taken by most cameras in this situation. Notice there are a lot of darks
and a lot of brights. It’s kind of interesting… But not nearly as interesting
or as eye-splitting as the HDR version, which I put right beneath it. Click on
any of these pictures to zoom in and see the larger version. In Flickr, click
on “All Sizes” to see the large or original.
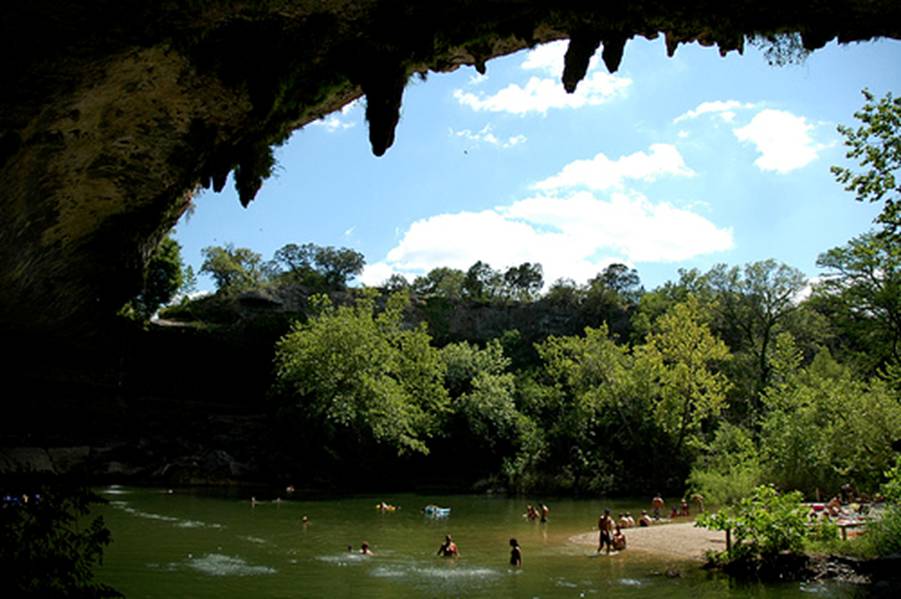
This part of the tutorial will focus on
those three pictures of the grotto. You can see the exposures (from Aperture,
which I don’t use any more since Lightroom came out) are all different… in this
case +2/0/-2. It was taken on a tripod (essentially essential).
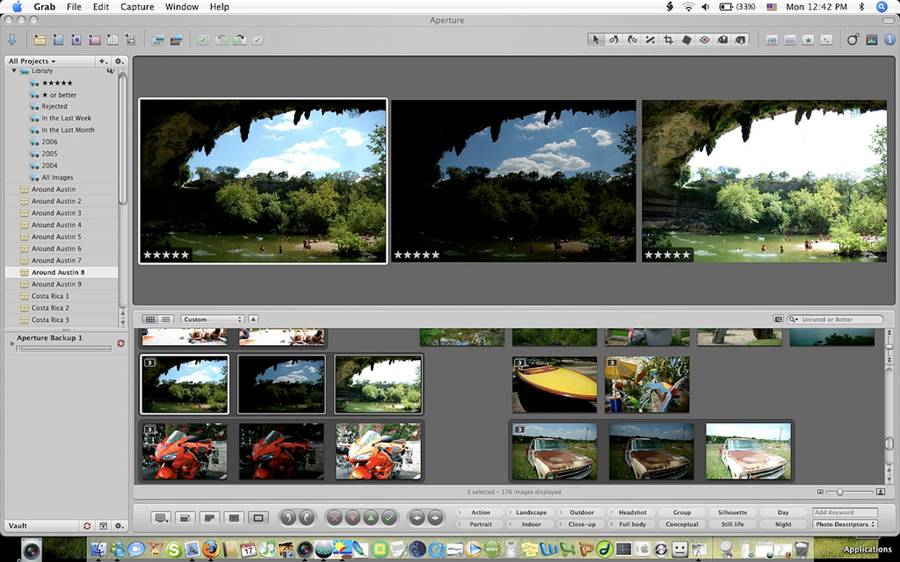
I selected those three pictures and
exported the JPEGs to a folder. Note that now I use all RAWs. I shoot all my
exposures in RAW because sometimes I just take that one RAW and turn it into an
HDR. This is a process I describe later.
In Photomatix, go to HDR > Generate.
Inside that dialog, choose the multiple exposures… In this case I chose the
three JPGs I just exported. After that, choose the defaults until it generates
the HDR picture. If you did not use a tripod (tsk tsk), then use that checkbox
on the 3rd dialog to “Align Images”. It will do a half-way decent job, but not
nearly as optimal as a tripod.
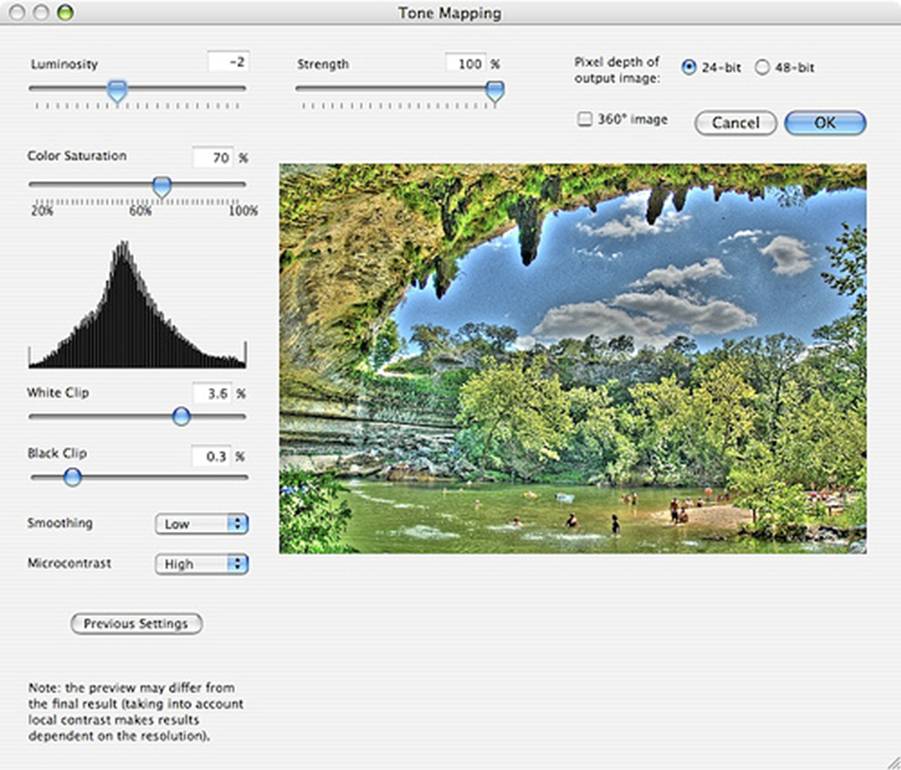
After that, go to HDR > Tone
Mapping. This will open up a fun dialog box with all sorts of sliders and
buttons to play with. There is no “magic” selection in here. It totally depends
on the picture.
There are a few rules of thumb that I
have discovered, however:
- If you take the luminosity below
0, you will get a halo-effect. It can sometimes look cool, but it usually
makes the picture look fake or cobbled together.
- If you set the smoothing to
anything other than “high” you get some very strange coloration and
embossing effects that no longer look natural. You can do some artistic
things with different smoothing settings, but they rarely look realistic.
- The color saturation should be set
a little lower than you think. The final version always comes out 10-20%
more saturated than the preview for some reason.
- High luminosity causes noise. But
don’t worry about that… I’ll show you how to get rid of that.
Below, you can see what it looks like
when you go too crazy on the settings. It’s very outlandish and kooky, and
kinda cool, but you don’t really want to ruin the picture like that.
This screenshot below is from an
earlier version, but it still serves its function here:
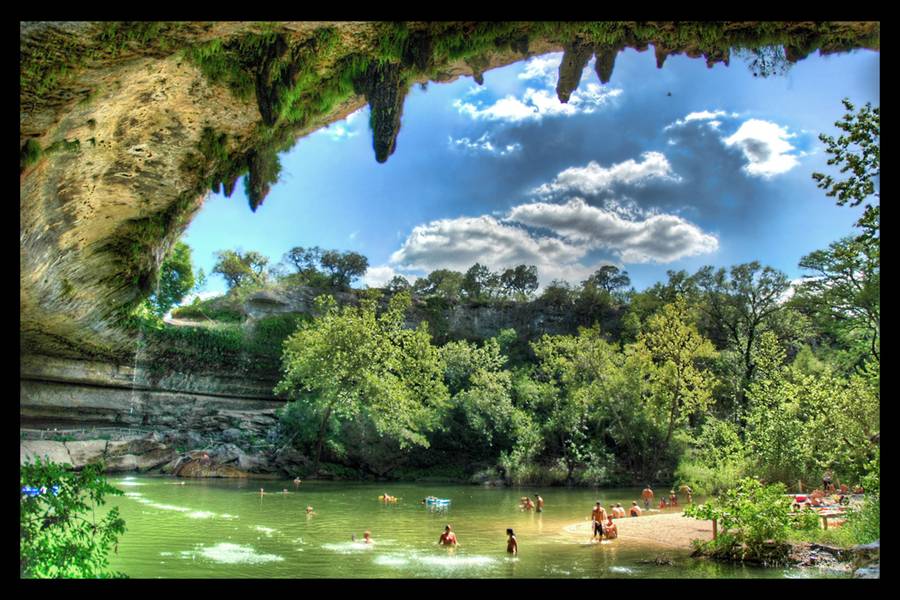
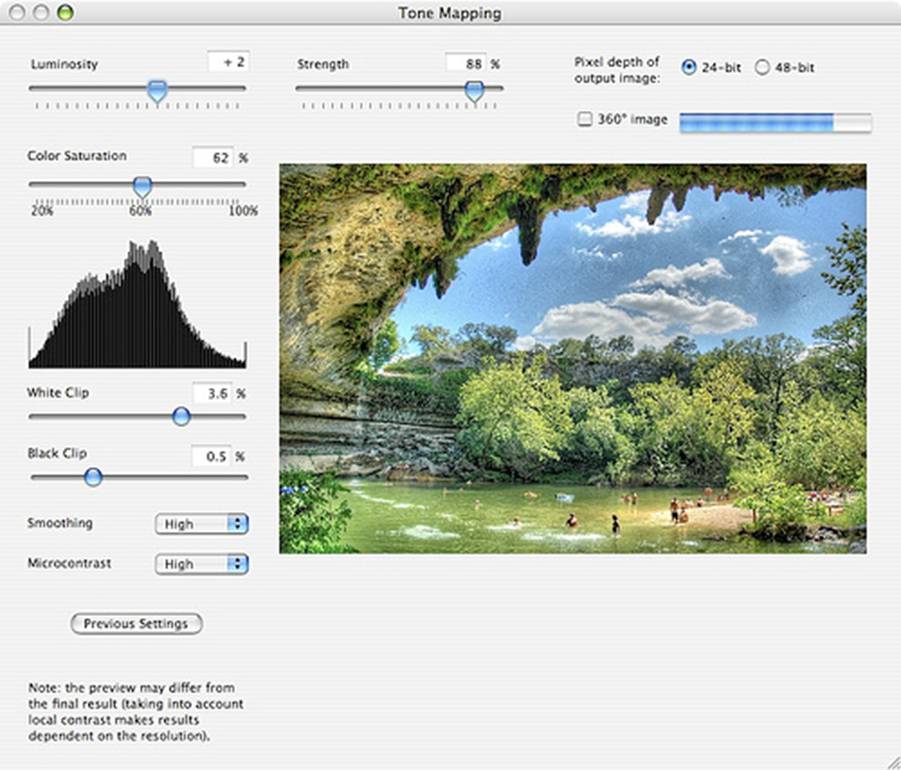
The next version shows settings that
are just about right. In truth, I set the saturation too high… It came out a
little too colorful.
After you tone map, save the image as a
JPEG and then load up sweet lady Photoshop. What, you’re not good at Photoshop?
It just takes some practice… there are so many good tutorials on the web. Just
practice 30 mins a day or so and learn different tools… It’s fun.
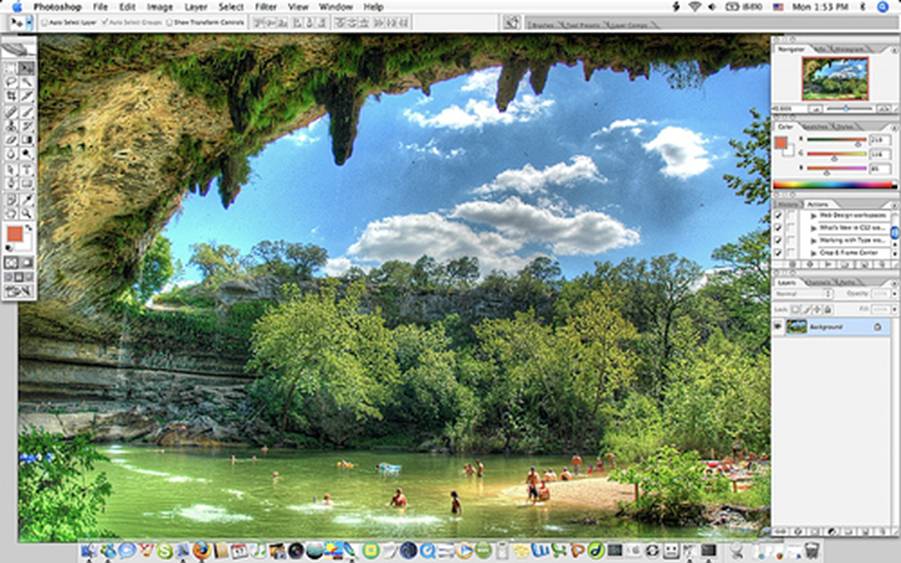
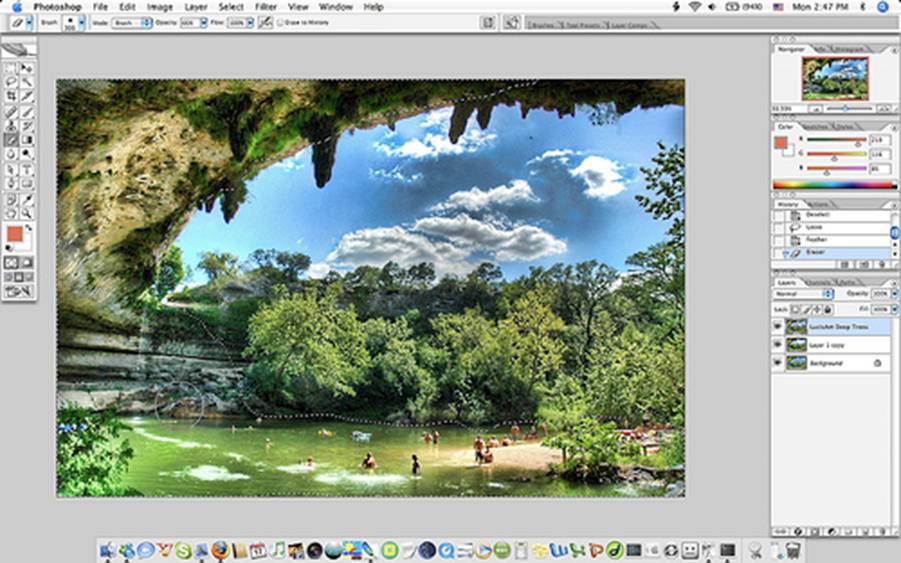
Okay see all those black dots around
the image? Those are bats! Yes this place, Hamilton Pool, is one of the best
kept secrets in Austin. The preserve’s pool and grotto were formed when the
dome of an underground river collapsed thousands of years ago. There is a ring
of 45-foot waterfalls all around the rim. Flow was light this day, but you can
still see a few streams of water coming down.
Even though the bats are cool, they
look like dirt, so I went in with the Clone Tool and got rid of them. Except
for one. There was one large and perfectly formed bat in the upper right that I
kept.
Next, I duplicated the background
twice. Here is a high-level description of what I am gonna do:
- Bottom layer: Super-detailed
clouds
- Middle layer: Current picture with
nice details
- Top Layer: Trees will be sculpted
and made…more… dreamy.
Then we will poke holes in the upper
layers at various levels of opacity to see through to the bottom layers. Yes,
you can use masking too, and that is what I normally do. But I find masking is
hard to teach people, but erasing and poking holes is easy.
Please note that not all pictures get
this treatment… it totally depends on the picture. In this one, it is great
because it has some clouds that need some detail, it has trees that need less
detail, and it has people/water than need average detail.
There are TWO ways to give details to
the clouds. One is free using “FILTER > OTHER > HIGH PASS” and the other
is sweet lady LucisArt. By the way, yet another way to skin this cat is with
“Unsharp Mask”, but I can’t talk about all these methods all day… this would
turn into a poorly written help file for Photoshop.
I will describe the High Pass method
quickly here without a lot of screenshots. This is what to do. Select the top
layer. FILTER > OTHER > HIGH PASS. Adjust the slider bar so you can
barely see the edges. Hit okay, then change that layer mode to OVERLAY. That is
the dropdown over there in the layers panel. Note that it sharpens all the
edges of the entire picture, including the clouds. That probably is not enough,
so select that layer and dupe it (apple-J) multiple times until you get some
tasty contrast and details in the clouds. You will notice the rest of your
picture starts to look crazy… But after you are done, then put the original
background version on the top layer and “erase” through it to get to your
detailed clouds.
Detail method 2: LucisArt (preferred)
LucisArt is awesome. I am sure after
you see this you will want to get it. I suggest you download the trial and give
it a run… the trial is nice because you get a preview window that shows what
all the cool sliders do. You should still buy it, even though their webpage is
rather JeffK. I don’t know how such a cool art-related product has such a 1998
webpage, but I digress again. I just got a note from them with the following LucisArt Coupon Code: BAW1234
Select the bottom layer and turn the
others off. Go to Filter > LucisArt and adjust the settings to… hmmm… well
it depends on the clouds. Every cloud is different.. I’ve really been learning
my clouds. The settings for cumulonimbus are different than cirrus are
different than mammatus are different than altocirrus, etc.
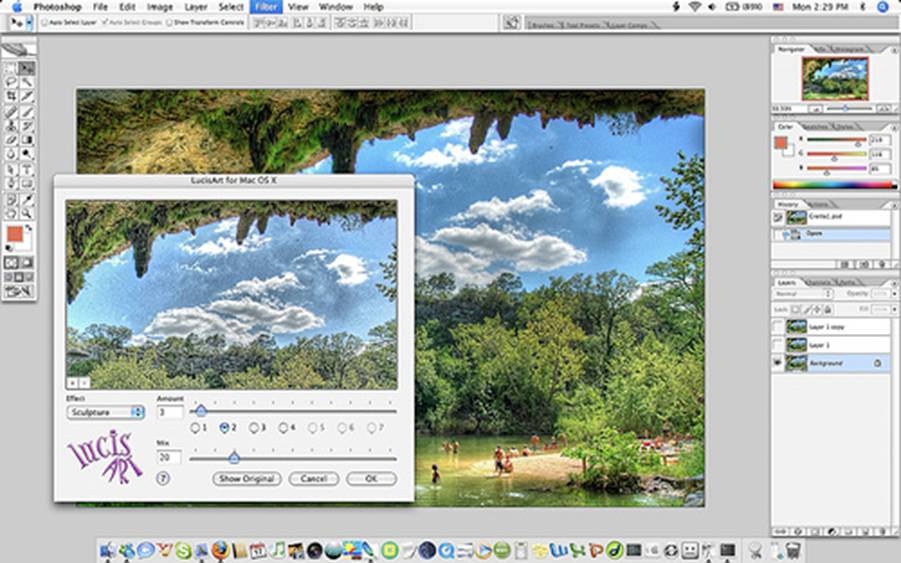
The two best filters in LucisArt are
sculpture and exposure. In this case, I chose sculpture and put the top slider
around 3. The lower the number, the more details you get. That second radio
button seems to be some kind of strange embossing level. The bottom slider
adjusts the mix level, how extreme it mixes with the original. There is no
magic setting, as I said… just play around with it.
You will notice extra noise as well…
don’t worry about that now. We’ll Gaussian Blur that out later…
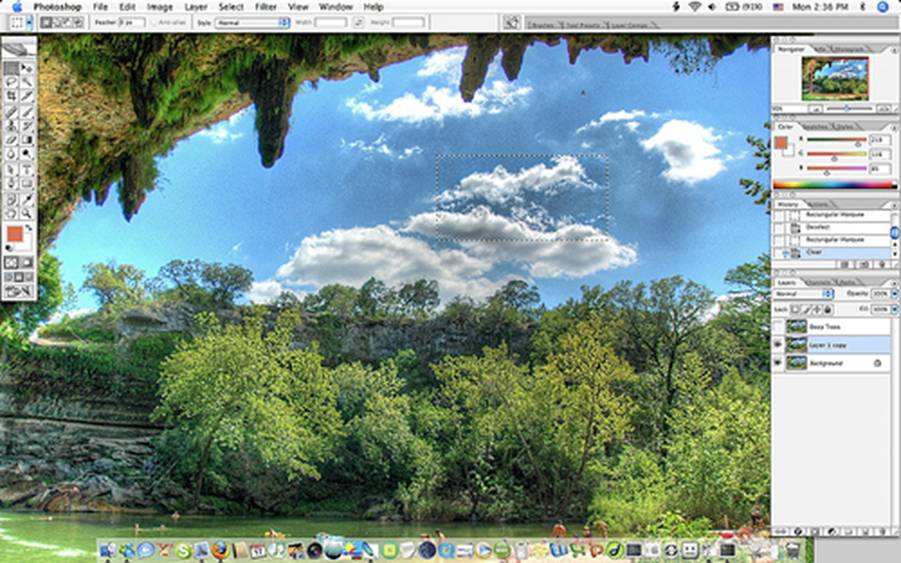
Now I turned on the second layer. I
used the selection box and cut a hole in it so you can see through to the nice
cloud details. On this level, you will want to go ahead and poke holes by
erasing all the clouds so you can see the detailed clouds from below. You may
want to come back to the middle layer later (if you are even using this middle
layer technique), and do some more erasing if you like the details more on the
bottom layer.
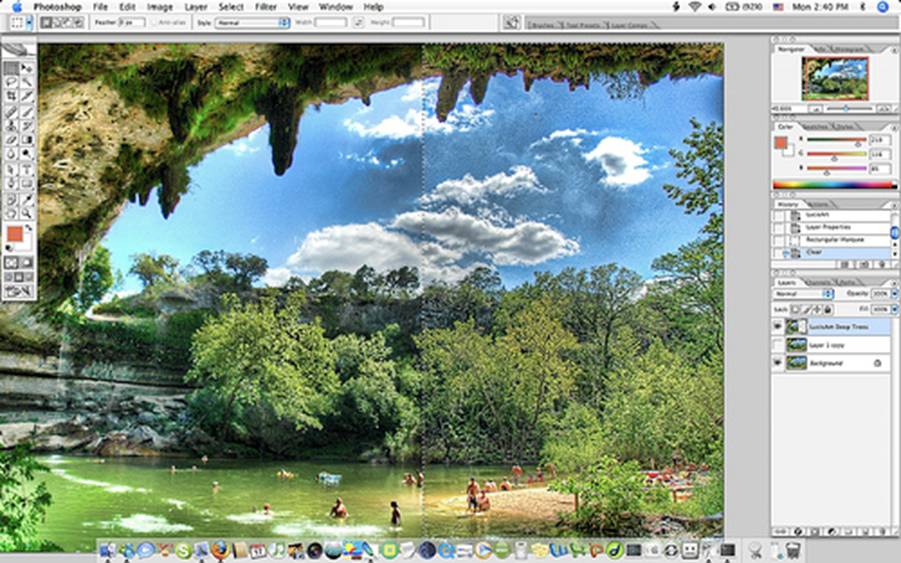
Okay now let’s work on the top layer.
This is where we are going to make the trees look much better. The trees are
already good, yes? But they can look better… Sometimes detailed trees are good,
but sometimes they look better if some of the sharp details are decreased. It’s
not exactly blurring, but “sculpting” is maybe a better word. So bring up
LucisArt again and slide the top bar up above 25 somewhere. It is impossible to
know beforehand the proper setting. Sometimes it’s 25, sometimes it’s 37, 43,
you just have to play with it. The mix is also variable. I think in this case I
did around 30 or so.
In the picture below, you can see I
cutaway half the picture so you can see the effect (I did the undo after the
screenshot). You have to zoom into the original size to see this effect. The
left side has the high sculpt setting and the trees look better (to me) than
the super-detailed trees on the right. I won’t get into my philosophies on
photography, but too many details in a picture distract the eye.
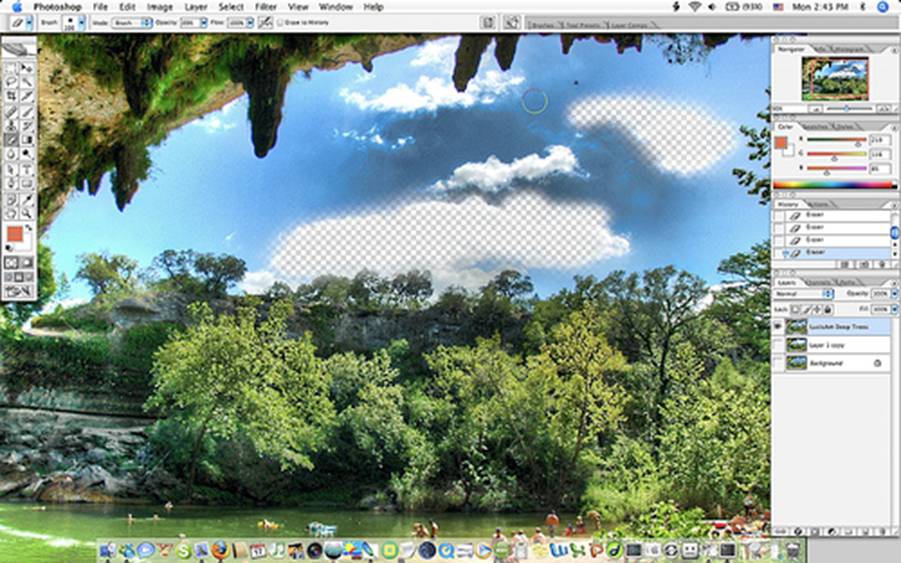
In the next screenie, you can see that
I am on the top layer and using the eraser at 90% to erase the clouds… When I
re-activate the bottom layers, the clouds will come through with nice details.
Then in the next picture you can see
the selection all around the outside. It was feathered to about 40 for fading
purposes… I then erased it at around 60% opacity to see some of the brighter
details of the lower levels. Again… this was particular to this specific
picture.
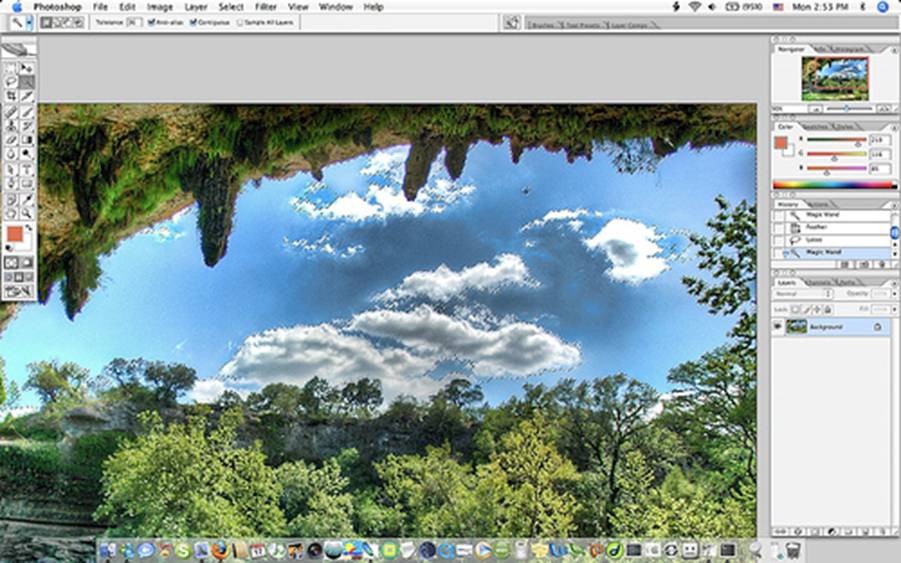
Aha okay now the final step. This
should always be a step for people that HDR skies. Luminosity increases in the
tone mapping normally create noise. Noise is fine in most places and hardly
noticeable except in the sky. So choose the Magic Wand Selector and keep
adjusting the Tolerance until you have SHIFT-clicked all the blue sky. Feather
it by 2 or 3 and then choose FILTER > BLUR > GAUSSIAN BLUR. Put that
slider on 2.5 or so….whatever looks smooth.
Then…tada – you are done. That is an
hour of your life you will never get back, but let’s hope you formed some good
memories and skills to create more. ☺

Part 17 I think – Single RAW for HDRing
a Scene with Motion
The best way, IMHO, is to use the hidden and undocumented Photomatix feature
for processing a single shot. First, open up Photomatix 2.2 or later, then go
to the Automate > Batch Processing. In there, just select one raw file and
hit run. It will generate the HDR for you. You can see this dialog below. The
only thing to do different than below is to just choose one of those RAW files
(the .NEF files).
The picture below can only be read in the
Original size.
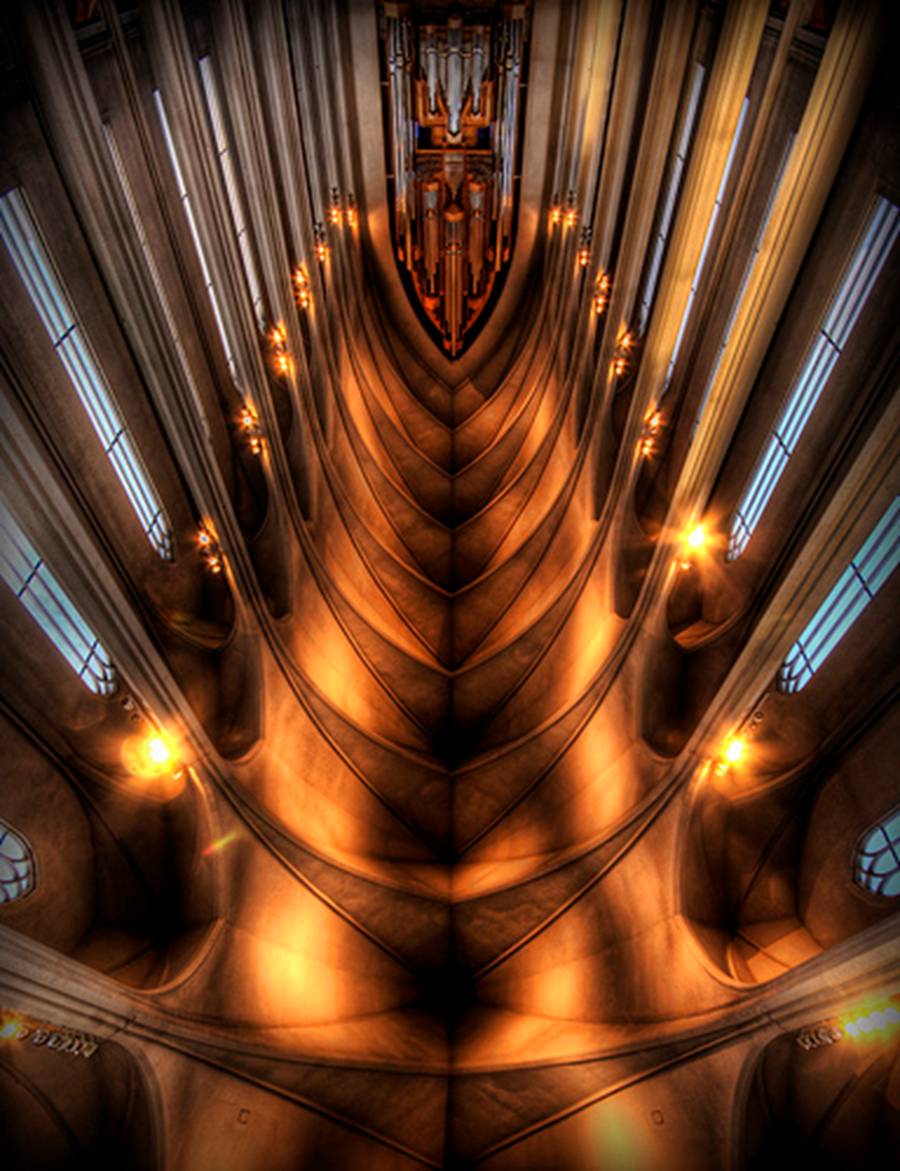
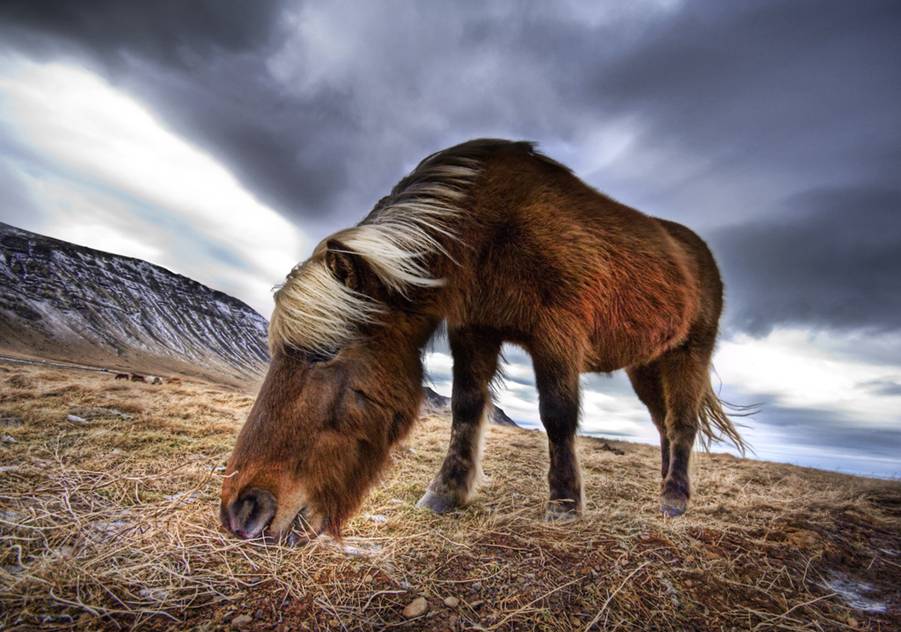
And here are a few
more examples of HDRs from a single RAW file:
Okay that is it… Hope
you enjoyed the tutorial… best of luck to you.