PHOTOGRAPHY TIPS
To Get The Most
From Your New Camera
http://www.best-family-photography-tips.com/
 If you’re like most
people, you already have a digital camera. Now it’s time for some tips to get the
most from your new camera.
If you’re like most
people, you already have a digital camera. Now it’s time for some tips to get the
most from your new camera.
Although these tips are geared
primarily for beginners (especially those who have just purchased a new digital
camera), some of the advice will also be useful to those who've been taking
pictures for years and want to improve their photography skills.
A photography tip doesn't need to be
monumental; it just has to be something that you weren't previously aware of.
Basic
photography tips
http://www.digital-cameras-help.com/basic-photography-tips.html
There are three technical elements that
"make" an image
- Aperture
- Shutter speed
- ISO speed (sensitivity of the digital sensor)
1. Aperture
The aperture determines the amount of light
that gets to the digital sensor. A SMALL number indicates a LARGE aperture, good
lenses start with a maximum aperture of 2, better and more expensive lenses
start at 1.1!
Apart from the quantity of light that is
allowed to get through, the aperture also determines the DOF (depth of field).
The numbers you see on the side of a lens
usually look like this:
F 22 | 16 | 11 | 8 | 5.6 | 4 | 2.4
At F 22, the lens lets in a very small amount
of light, it is at minimum aperture. At F 2.4, the lens lets in the maximum amount
of light that it has been designed for.
Each number represents a double increase (or
decrease) of the quantity of light that is allowed through the lens.
For example: at aperture 5.6 you
allow 2 times more light than at aperture 8, and 2 times less light than at
aperture 4
On "point and shoot" digital
cameras you do not see this numbers on the side of the lens, the process of
opening and closing the aperture is controlled electronically and has also
increments like: 5.9 or 8.2
2. Shutter speed
The shutter is the device that controls the
exposure time of the photo. The exposure time usually begins at 1/2000 sec. and
goes up to 30 sec.
At 1/250 sec. exposure time, the
shutter will let in 2 times more light than at 1/500 sec. and 2 times less than
at 1/125 sec.
The exposure time determines how a photo will
look, if it will be "shaken" or crystal clear. For example: you want
to take a picture of a water fountain. You have two options, use a short
exposure, or a long one. A short exposure (of 1/2000 sec.) will
"freeze" the water droplets in mid air; the detail of every droplet
will be clearly visible in the photo. A long exposure time (of 1 sec.) will
create a special effect where the falling droplets traces unite to create
streams of water.

Aperture
Priority | Shutter Speed
1/25 | Aperture
Value 8 | ISO
Speed 50

Aperture
Priority | Shutter Speed
1/1000 | Aperture
Value 3.2 | ISO
Speed 50
3. ISO speed
ISO speed is the third element that
"makes" a photo. It is usually expressed with the following numbers:
50 | 100 | 200 | 400 | 800 | 1600 | 3200
These numbers tell you how "fast"
does the digital sensor react to the light sent through the aperture and shutter.
A small number means that it takes a
relatively long time to take a photo, a large number, a very short time.
But things are relative in using the right
ISO setting. On an average digital camera, the ISO goes from 50 to 400. The ISO
speed 50 is usually used on bright sunny days, while the 200 and 400 ISO is
used in low light conditions (like interiors or at night)
There is also a problem with the image
quality regarding the ISO speed. At large numbers, 400, 800, the image will
contain "noise", so use the low ISO speed as much as possible.
Here is a table that will further explain how
the aperture, shutter speed and ISO speed are used TOGHETHER to
"make" an image. I'll give a theoretical example of how this three
indicators work together: At ISO speed 100 you select an aperture of 8 and the
shutter speed is calculated by the camera at 1/250 sec. The same image*,
mathematically speaking, can be created using the following settings:
|
ISO speed |
Aperture |
Shutter speed |
|
100 |
16 |
1/60 |
|
100 |
11 |
1/125 |
|
100 |
8 |
1/250 |
|
100 |
5.6 |
1/500 |
|
100 |
4 |
1/1000 |
same image* - the same in theory but with
different effects on the final, real image
As you can see, with the ISO speed constant,
the aperture and exposure time increase or decrease in connection with each
other; if the aperture allows more light into the camera, the shutter speed
decreases to compensate and give the perfect exposure.
But what happens to these theoretical numbers
if you set the ISO speed at 50? Take a look:
|
ISO speed |
Aperture |
Shutter speed |
|
50 |
11 |
1/60 |
|
50 |
8 |
1/125 |
|
50 |
5.6 |
1/250 |
|
50 |
4 |
1/500 |
|
50 |
2.8 |
1/1000 |
You can modify the aperture, keeping the
shutter speed constant, or you can modify the shutter speed, while keeping the
aperture values constant:
|
ISO speed |
Aperture |
Shutter speed |
|
50 |
16 |
1/125 |
|
50 |
11 |
1/250 |
|
50 |
8 |
1/500 |
|
50 |
5.6 |
1/1000 |
|
50 |
4 |
1/1250 |
Depth of Field
Depth of field is the amount of distance
between the nearest and farthest objects that appear in focus in a photograph.
In simpler term, we define depth of field as the zone of sharpest focus in
front of, behind, and around the subject on which, when lens is focused on a
specific subject.
There are three key factors that have a
direct relationship with depth of field:
Aperture
Focal
length of the lens
Image size
The general rule for selecting the right
aperture for a desired depth of field is: given the same object distance and
the image size, the bigger lens opening (aperture) used (like f/2.8, f/2, f/1.4
etc.) will have a narrower band of depth of field.
Depth of field increases with distance. The
farther you place the camera from your subject, the more depth of field you can
obtain. Landscapes have great depth of field, while macro photographs tend to
have very little depth of field because the subject is so close to the lens.
Aperture
Aperture is a device that controls the
quantity of light that passes through the lens. It is an iris type mechanism,
which shrinks or grows in order to let in less or more light.
The numbers you usually see on a lens are:
F: 3.5 4.5
5.6 8 11 16 22 32
Each number lets in two times less light than
the previous one.
Small numbers represent a large aperture, big
numbers - small aperture. Most digital cameras do not have this numbers written
on their lenses, but they use aperture as part of their construction. It is
also the way for you to select aperture
priority shooting mode from your camera to control the depth
of field.
Focal Length
The focal length of a digital camera lens is
the distance between the center of the lens and the image sensor when an
in-focus image is formed. The focal length of a digital camera lens is
displayed on the barrel of the lens along with the measurement of the largest aperture
and the maker.
The focal length of a lens establishes the
field of view of the camera. The shorter the focal length is, the larger the
field of view.
Camera lenses are categorized into normal,
telephoto, and wide angle, according to focal length. Thus a 200 mm equivalent
telephoto lens gives a 4 x magnification over the 50 mm equivalent lens.
The Top Photography Tips
Basic Photography Tip
#1: Read The Owner’s Manual
(a.k.a. "What am I supposed to do with this?!")
Although your camera’s manual may not
suggest this, the very first thing to do is to locate the battery and the
re-charger. Check your manual for how to properly charge your battery, and then
immediately start charging it!
Most owners manuals don't discuss rechargeable
batteries, which are perfectly safe for just about all cameras and
photographic accessories (always check your product's specs, to be sure).
Are rechargeable batteries right for
everybody? No. Most people will benefit from them. However, if you take less
than a 100 pictures per year, you're probably better off sticking with
non-rechargeable batteries.
On the other hand, if you take more
than 100 pictures/year, you will find that rechargeable batteries will easily
pay for themselves in money and convenience.
I've been using and reusing different
types of batteries from all-battery.com
for the last three years on a continual basis, and have found them reliable and
extremely cost effective.
Back to the owner’s manual, which most
people rarely open. Most of us want to immediately begin playing with our new
camera and take some pictures. Unfortunately, most digital cameras won't allow
this because the camera doesn’t have any power and generally requires its own
battery to be charged up.
This forces us to wait, so we might as
well use this time to go over the basics of how the camera operates (as well as
the other photography tips noted here). If your camera has an AC adapter,
although impractical for taking pictures on the go, you can at least get
familiar with your camera while its battery is charging.
As you go through the manual, make sure
you understand where each control is and how
to use it.
One huge advantage a digital camera has
over its film equivalent is the ability to merrily take as many photographs as
you want while learning how to use the camera. At the end of the process, you
can simply delete the unwanted images without costing a cent.
Filed under "lesser known
photography tips," the two items you will probably want to quickly
purchase are more memory (digital "film") and at least one spare
battery.
It pays to go through the entire manual, if only to familiarize yourself with
where everything is. Until you are familiar with all the controls, you will be
referring to the manual frequently. If you don’t know how to find anything,
it’s going to get pretty frustrating very quickly.
Basic Photography Tip #2: Glossary - The
Most Basic of Help
If you are new to photography, you will
probably find some words that are unfamiliar. The "Glossary" or
"Terms" page of your manual is full of photography tips in as much as
it explains what things are.
Another good basic page is the one
showing where everything is located on your camera. After all, it’s important
to know what the shutter priority is, but it’s also critical to be able to find
it!
For some more complicated cameras, it’s
not uncommon for the manufacturer to include a short reference sheet including
important camera details/features that you can carry with you. As an
alternative, you may want to construct your own card with what you think are
the most important details.
Basic Photography Tip #3: Know Your
Controls
There is a big difference between
knowing what your camera controls do and being able to use them quickly
and effectively. This example will illustrate the point.
Let’s say you are watching a parade
that contains several floats. On one of the floats is your child. When that
float is close, you want to get some shots of your child on it. If your camera
is set to auto-focus, and there are many objects on the float, your camera
doesn’t know which object to focus on.
You know that you want to photograph your child, but to the
camera, the large fire engine seems like a more logical point of focus.
One quick solution is to switch from
auto focus to manual focus and focus on your child to insure he/she is in
perfect focus.
But, if you have to refer to the manual
to figure out how to do this, your child and the float will be out of view by
the time you figure it out.
Your goal is to be at least familiar
enough with your camera that you can quickly change settings and still capture
the photograph. Even with static subjects like architecture or landscapes, you
will sometimes have to work fast to catch a particular lighting effect.
Time spent getting to know your camera,
and what all of the buttons and menus do will pay dividends when you need it
for that once-in-a-lifetime photograph.
Basic Photography Tip #4:
How You Hold Your Camera DOES Make a Difference
I’ll wager that if you bought your
camera at a camera store, nobody took the time to explain how to properly hold
it. This is one of those things that professionals do unconsciously, and
beginners may never do until somebody points it out to them (or they learn the
hard way).
If you observe others taking
photographs, this photography tip would not be necessary. Why? Because you
would have already noticed that people often hold cameras with their fingers
partially blocking the lens.
The second thing you would notice is
fingers getting in the way of the flash or red-eye reduction light. Bottom
line, you want to hold your camera so that it is comfortable, secure, and able
to take unobstructed photographs.
 The other photography tip concerning how your camera is held
involves movement. Your objective is ALWAYS
to hold the camera as still as possible.
The other photography tip concerning how your camera is held
involves movement. Your objective is ALWAYS
to hold the camera as still as possible.
Although not obvious, holding your
camera absolutely still does not come naturally.
And the longer the exposure time, the more likely the photograph will lose
sharpness… that is, unless you use a tripod.
Tests have shown that almost all
pictures taken at normal shutter speeds are not as sharp as the picture would
have been had the camera been on a tripod.
For example, the butterfly above is not
very sharp because the shot was taken with a hand-held camera not
mounted on a tripod. By the way, if you HAVE TO take this type of shot without
a tripod, use the fastest shutter speed possible. The less time the shutter is
open, the less opportunity for camera shake to impact the shot.
If the camera is large enough, grasp
the camera firmly in both hands, the right one on the camera body with your
first finger poised on the shutter button; and your left hand either under and
around the lens, or on the bottom of the camera body.
With small cameras, the fingers of your
left hand will probably go over those of your right. (Not too many cameras are
built for lefties.)
Just as in shooting a rifle, remember
to relax your breathing and to squeeze
the shutter button (not jerk it) just before firing. I recommend NOT using the
LCD screen, because you cannot steady the camera against your head.
Basic Photography Tip #5: Shoot in both
Portrait and Landscape Format
 Although most people
take photographs in what's known as the "landscape" format (where the
subject comprises a rectangle whose width is wider than its height), there are
other approaches.
Although most people
take photographs in what's known as the "landscape" format (where the
subject comprises a rectangle whose width is wider than its height), there are
other approaches.
One of the most overlooked aspects of
photography is for the beginner to NOT
experiment with non-landscape formats.
 The portrait format is an excellent (although
neglected) photography format. It can be most effective for photographing
people, as the example to the right illustrates.
The portrait format is an excellent (although
neglected) photography format. It can be most effective for photographing
people, as the example to the right illustrates.
Since most cameras are manufactured
with a landscape format as the "normal view," the photographer needs
to remind themselves to take pictures from other perspectives.
Get used to rotating your camera 90 degrees
and looking at the world that way too. For some very creative shots, experiment
with rotating your camera anywhere between 15 and 75 degrees.
If you develop the photography habit of
looking at the world from multiple perspectives, you will soon discover the
artistic side of photography and will be thankful you did.
In the beginning, when just learning
photography, it's a good idea to always photograph every subject from landscape
and portrait formats. Of course some subjects fit more naturally into
one orientation, but having to work at using the other can often produce more
interesting results.
Basic Photography Tip #6: Move in Close
The most basic of your
photography "accessories" are your feet. One of the most common
faults in photography is capturing pictures while too far away from your
subject, especially when your subject is people.
 Unless you are taking
pictures of dangerous situations such as a burning building or wild animal, move in close.
Unless you are taking
pictures of dangerous situations such as a burning building or wild animal, move in close.
Yes, I can tell what you're thinking...
"If I have a good telephoto lens, I don't have to move in
close." Umm... not exactly true.
Telephoto lenses are great. I use them
all the time.
However, there is a difference between
taking a photograph from afar with a telephoto lens, verses moving in close and
not having to use one.
No, this isn't technically a
"basic photography" tip, but the best way to see the difference is to
test it out yourself.
Take pictures of the same subject from
close and from a distance with a telephoto lens and note the difference.
As a rule, if you're not using a flash,
always move in close.
If you are using a flash, you need to
observe all the basic photography rules for flash
photography. Bottom line, if you feel your photographs aren't good enough,
you're probably not close enough.
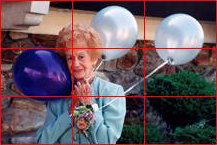
Basic Photography Tip #7: Don't Place
your Subject Exactly in the Middle
 The composition goal of photography IS NOT to place the subject in the center of your
frame. However, as with most "rules," there are exceptions.
The composition goal of photography IS NOT to place the subject in the center of your
frame. However, as with most "rules," there are exceptions.
Occasionally, it does make sense to
have your main subject in the center of your picture (as in the sample to the
left). When, you wonder? Usually when you want to make an image deliberately
symmetrical, perhaps to emphasize its formality or when the background is
irrelevant.
Because most cameras still focus
(either manually or automatically) on the center, many beginners have the
erroneous impression that good photographs should be composed with the main
subject at the center.
When you are setting up a picture,
focus in on the most important part in the middle, and then recompose the shot
so the main subject is off center. How far off center? A basic photography goal
on composition is using the rule of thirds for where to place the main subject.
 If you drew vertical
and horizontal lines dividing your rectangular field of view into 9 evenly
spaced rectangles, any one of the 4 points where the lines intersect is the
optimum point to place your subject.
If you drew vertical
and horizontal lines dividing your rectangular field of view into 9 evenly
spaced rectangles, any one of the 4 points where the lines intersect is the
optimum point to place your subject.
Word of caution... don't become a
photographic robot! Use the rule of thirds when it makes sense, but not
automatically for every subject!
Once you begin to move beyond basic
photography, you will start to develop an intuitive feel for things. When that
happens, the best advice any photographer can give is to let the subject of the picture determine its own
composition. If you're not sure, take several photos placing it in
several spots; bearing in mind the right place is almost never in the middle.
Digital Photography Training
Tip #8:
What is "Depth of Field" and Why Should I Care?
Depth of Field (DOF) is one of those rare animals in photography... a basic
photography term, yet complicated to understand and use.
So, that's why we've included it here
in digital photography training.
To understand it, you need to realize
one particular fact in which your eyes have been deceiving you.
When you look at most photographs (any
photo where all the objects are not EXACTLY THE SAME DISTANCE and DIRECTION
FROM YOU), objects that are at varying distances from the camera appear to
be in focus.
 Take this photograph
for example. The pellican and the trees all appear to be in focus.
Take this photograph
for example. The pellican and the trees all appear to be in focus.
In reality, only the pellican is in perfect
focus. Here is the basic photography truth: there
is only one point in any photograph that is in perfect focus.
The exception to this rule is if there
are more than one object in the same plane and distance from the camera. In
that case, all objects in the same plane and distance from the camera would be
in focus.
Other objects in the photograph which
seem to be in focus, technically are not. They are within what could be called
"the zone of sharpness," and hence they appear sharp
or, "in focus."
The Depth of Field is
the distance in front of and behind the exact focus point. This is the area which seems to be in focus.
You can tell the depth of field after a
photograph is printed by determining the range of objects which are in focus.
For example, if the closest object in a
particular photographic print that seems sharp is at 5 feet, and the most
distant object is at 15 feet, then the depth of field extends from 5 to
15 feet from the camera.
Realize that depth of field is not an
absolute measure, as it depends on the size of the print, the viewing distance
and the visual acuity of the observer.
Why are we spending all this time on
depth of field? Without an understanding of how to blur what you want and not
blur what you want sharp, you will only produce the desired results about 1/2
the time.
When you see an object/subject that you
want to capture (and, have in focus), you can do so by making the subject
remain in sharp focus while the background is blurred (or "thrown out of
focus").
Or, you can photograph the same subject
and blur it, while keeping the background in focus.
Two obvious examples involve taking a
picture of a beautiful rose in front of an unsightly garbage dump. You would
want to blur the background as much as possible, while the rose is clear and
sharp.
On the other hand, a photograph of your
family in front of the Grand Canyon loses most of its impact if you can't tell
it's the Grand Canyon, right? In that case, you want to have BOTH foreground
and background as sharp as possible.
So, how do we create the effect we
want? There are several factors that go into depth of field: lens focal length,
camera-to-subject distance, and aperture.
We will focus on the basic points for
achieving these 2 different result.
- To have everything in the photo
SHARP:
For landscapes and large groups, use a normal or wide angle lens (not telephoto) and as small an aperture as possible (F22 for example). - To have the main subject sharp
while the background is out of focus:
Typically for portraits, use a mild telephoto lens (minimum 100mm) in combination with a very large aperture (example: F/2.8). If a telephoto is not handy, use as large an aperture of whichever lens you are using.
Digital Photography Training Tip #9:
What is important to know about the Aperture?
The camera's aperture is the hole
through which light enters the camera.
Since every camera has an aperture, it
doesn't technically belong under the "Digital Photography Training"
heading; however it is important to understand how it impacts digital
photography.
Apertures are measured using a relative
scale, called "F numbers" such as F/4, F/5.6, F/8, F/11, etc. The smaller
F numbers refer to larger openings to let in light. The larger the
aperture (smaller F number) the less time the camera needs to take a picture.
For any particular light level and ISO, there is a range of "equivalent
exposures" which will produce the same digitally exposed
photograph.
For example, the following combinations
of how long the shutter is open (shutter speed) and aperture opening (f number)
will produce the same exposure:
- 1/500 at F/4
- 1/250 at F/5.6
- 1/125 at F/11
- 1/60 at F/16
Although the above settings will
produce the same exposure, the results will
often look rather different. As an example, if you are photographing
a moving car, 1/500 at F/4 will probably give a fairly sharp result because the
aperture is only open a very short time.
However, if you use the slower shutter
speed of 1/60 at F/16 you will get a blurred result, since the car has moved
quite a distance in 1/60th of a second.
Part of the challenge involved with
digital photography training is that there are so many different digital
cameras available. Since each camera uses different modes, controls, and
technologies, digital photography training has to stay somewhat generic.
Many simpler cameras do not allow you
to control the aperture independently. However, they may offer different
"program modes," such as a "sports" or "action"
program.
These programs use a very fast shutter
speed, typically between 1/500 and 1/2000. Check your manual for specific
details.
Digital Photography Training Tip #10:
Shutter Speed and Subject Movement
Shutter speeds are very important when
photographing moving subjects. Without going into heavy mathematical
discussions, adhere to the following guidelines to reduce motion blur:
- When the subject is moving across
your field of view (right to left, for example), panning the camera while
you take the shot will keep your subject sharp and blur the surroundings.
- If you are not panning, use as
high a shutter speed as possible with your lens (1/2000 second for
example).
- If you can't use that high a
shutter speed, increase your ISO (as long as the result won't be grainy).
That will allow you to go to a faster shutter speed.
- The farther you are from the
subject, the less of an impact will be made by subject movement.
Related topics
- How
to Really Use Your Camera's Aperture
- Learning
About Photoshop
- The
Top 10 Digital Photography Tips
- Which
Digital Camera Features Are Important For You?
- Photography
Articles
CAMERA
APERTURE
The camera aperture is one of those
"technical" camera aspects that many photographers don't see any
benefit in truly understanding. What we're going to do is discuss the
photographic benefits if you fully do understand it. Let's focus on two
specific areas:
- What is it?
- Why is it important (in my
selection of a digital camera)?
What is the camera's aperture?
The aperture relates to how much of the
lens is opened. When you look at your camera lens, one end extends the furthest
from the camera, while the other is next to a diaphragm in the body of the
camera. The diaphragm controls the size of the aperture.
Think of the pupil in your eye. Notice that when you enter a dark room, your
pupil opens very wide, to allow in as much light as possible.
When you go outside on a sunny day,
your pupil constricts (that's tech talk for "gets smaller") because
it wants to reduce the amount of light that enters your eye.
The aperture in your camera works the
same way. When there is a lot of light, the aperture will usually be set to a
small physical opening (denoted by a large number). Click the
"play" button below for more information on the aperture.
aperature demos:
http://www.youtube.com/watch?v=g5310BnZo8A&eurl=http://www.best-family-photography-tips.com/camera-aperture.html
http://www.youtube.com/watch?v=uzedefUXARE&feature=related
When there is very little light available, the aperture will usually be set to
a large physical opening (denoted by a small number).
One of the most confusing aspects of
basic photography is sometimes just the terminology. The aperture is often
described by several terms. Most common are: F-stop or f-value, but we will use
"F-stop" for our purposes.
The photographic image captured is
determined by how much total light (based on what you are photographing) enters
the camera via the lens. This amount is determined by the camera aperture.
During a specific given time period (example: 1/250th of a second) the larger
the physical opening (the smaller the "F-stop" number), the
more light enters the camera.
I know this is confusing, so don't
blame the messenger!
Why is the Camera Aperture important?
As you begin to shop for digital
cameras, you will notice that each camera offers a different range of F-stops
for their lens.
If you intend to focus on close-up
portrait work or macro photography (when the distance between camera and
subject is less than 6 inches), then Small F-stop
numbers are important to you.
An F-stop of 2.8 or lower is fine. A
small F-stop will blur the background while your subject is in focus.
If, however, you want to have your
subject and background in focus, a large F-stop number is required. An
extreme example would be if you were taking a photograph of a large group in
front of yacht, and you want EVERYTHING & EVERYBODY to be in focus. An
F-stop of 22 or higher would be good, although a lower number is often
acceptable for most uses.
Focus on the
APERTURE PRIORITY
Even though we can focus on the
"easy things" or the basics of photography, we can do so much more by
exploring additional tools. So we'll explore two specific areas of this topic:
- What is it?
- Why is it important (in my
selection of a digital camera)?
What is it?
You don't need to buy a digital SLR to
gain more control over your aperture opening (typically referred to as
"aperture priority"). Even today's "point and shoot"
digital cameras have custom controls (or "settings") in addition to the
automatic settings that most people use.
For example, during the day, you pick
the "Day" or "Sun" setting. For landscapes, you choose the
"Landscape" setting. For each automatic setting, your digital camera
automatically sets the required F-stop and shutter speed required for a proper
exposure.
Each manufacturer can include different
automatic settings; although the common ones are macro, night, sports (high
speed movement), and portraits.
For more control over the outcome of
your picture, many cameras have non-automatic settings. One of these settings
may be called "aperture priority" (occasionally referred to as
"AV"). This allows YOU to determine which aperture to use.
In the AV mode, you set the F-stop, and
the camera selects the appropriate shutter speed for a correct exposure. Why
would you want to do that? That answer is in the next section.
Why is it important?
We previously covered the concept of
having the foreground subject in focus, while the background was either in
or out of focus. To have the background out of focus, set the AV to
a low F-stop number (such as F/2.8 or F/4.0). Conversely, to have the
background in focus, set the AV to a high F-stop number (such as F/11 or
F/16).
If you want the flexibility to be able
to choose whether your photographs have a blurred or sharp background, your
camera needs this feature.
METERING
MODE
Your camera has a "mode" to
"meter" (calculate) the optimal exposure from the existing light conditions
that you are shooting in. Some digital cameras have more than one mode (as will
be discussed on this page).
In the world of photography basics and
tips, if your camera has more than one mode, it will be helpful to understand
them so you can use them to produce the best photographs under different
conditions.
We will focus on exploring two specific
areas of this topic:
- What is it?
- Why is it important (in my
selection of a digital camera)?
What is a Metering-Mode?
 Today's
digital camera is a true marvel when you think about what it does and how it
does it.
Today's
digital camera is a true marvel when you think about what it does and how it
does it.
When you look through the viewfinder
and decide to take a picture, many cameras require you to first press the
shutter button halfway down. This allows the camera to properly focus.
To capture the shot, typically requires
the shutter button to be fully depressed.
Between the time you first depress the
shutter halfway and the camera takes the shot, your digital camera's brain does
the following...
- Determines what the subject of
your shot is
- Focuses the lens
- Figures out how much light there
is for your subject
- Calculates the correct combination
of shutter speed (how long the shutter will remain open) and F-stop (size
of the aperture) to properly expose your photograph
But the most impressive thing is that
your camera accomplishes all of these feats in a fraction of a second. In terms
of photographic basics, when your camera "meters" the scene, it is
calculating the correct shutter speed and F-stop, based on the light at your
subject.
There are three primary Metering Modes:
- Evaluative or Matrix
- Partial or Spot
- Center-Weighted Average
Evaluative or Matrix Metering Mode
|
|
Depending upon make and model, the
viewfinder divides what you are viewing into "x" number of zones (the
"x" varies by model and manufacturer).
The camera detects the subject, the
lighting conditions (some or all of: brightness, front and back conditions, the
background), and whether you are holding the camera horizontally or vertically.
Based on this information, it
calculates the correct exposure that will produce the optimum results, and it
proceeds to set the proper exposure for your photo. Good thing we don't have
to think about all that when we take a picture, isn't it?
Partial or Spot Metering Mode
This mode does not weight all the zones
equally. The only part of the entire framethat is metered at all is the tiny
area right at the cener of your viewfinder. The exposure for everything else in
the frame is completely ignored.
Center-Weighted Average Mode
This is the "default" or most
common method for calculating proper exposure.
In Point and Shoot cameras, where there
is not any choice for metering methods, this is the one used on the camera.
On more expensive cameras, this mode is
almost always included as one of the choices. Similar to Evaluative metering,
this method also averages the exposure from the entire frame, but the center
area is given more "weight" in the calculations.
Why is it important to care about metering modes?
Bottom line,
- Center-Weighted Averaging is the least accurate metering
method.
- Evaluative or Matrix Metering is much more accurate, especially
when your scene contains very contrasting or variable lighting
(example-very dark and very light areas in the same scene).
- The Evaluative or Matrix
Metering Method should be used in most situations.
In very unusual scenes, a Partial or
Spot Metering Mode would be best to use. One example is if your child is
standing in front of a very bright window. If you used either of the other
modes, the camera would calculate a high overall level of light, and therefore
exposure would be set low, producing an under-exposed child.
If a Partial or Spot Metering Mode
were used, focusing on your child, they would be properly exposed, while the
window area would be over-exposed. However, given a choice, I'm sure you would
prefer your child to be properly exposed rather than the window.
PHOTOGRAPHY
POSE
The pressure is on. You realize without the
right pose, your photo is doomed. Well, not doomed exactly (sorry for the
melodramatics), but shall we say it will lack a certain pizzazz?
But, don't worry. Find out how to go from deleting-the-file
to FRAMED ON THE WALL!
If you have
a fairly good understanding of photography definitions, we're ready to go. If
not, let's do a quick review of key photography
features and terms.
OK, you have your digital camera, extra memory cards, rechargeable batteries, your "photography poses check
list" of desired photographs...
What? No list?
You thought you'd just wing it?! Tsk, tsk. Not this time.
That was the old "beginner
photography" you. The new "professional photography" you (well,
OK, "semi-pro") comes prepared.
There are two categories of GENERAL
ADVICE which apply, regardless of whether you're using a digital camera to take
a family photography pose, baby picture,
pet
portrait, group
picture, or even a staged funny photo.
They are Planning Advice and Location Advice.
Let's cover
the first category, Planning Advice.
Planning Advice
for Photography Poses
1) Prepare For The Event
Prepare for the event by thinking about every photograph you want to take and
what kind of photography pose or poses you would like to capture. Consider who,
where, how, and the type of environment.
2)
Take Multiple Photographs
Take multiple shots of each pose (remember, digital memory is reusable, a.k.a.
"free"). Regardless of what you say or do, people will blink.
And don't count on spotting small problems on the tiny camera LCD screen (even
on full magnification); which leads to...
3) Check the LCD Screen
 Check the digital camera's LCD screen only for general framing of the picture,
extreme movements, visibility of faces, and the histogram.
Check the digital camera's LCD screen only for general framing of the picture,
extreme movements, visibility of faces, and the histogram.
Do not use the LCD screen for any
fine review of the picture! (That is
what your computer is for.)
Note that you can have a fantastic
photography pose; arrange everyone perfectly; and, have the photograph
"frozen" (no blinking, and no shaking of the camera)...but, when you
check it out in the LCD, you see 2 drunks fighting in the background!
4) Funny Phrases
Have some funny phrases handy to use just before you take the photo.
Don't use them when setting up for the shot.
And, don't use the same phrase all the time. Throw in funny anecdotes, phrases,
names, words that you know your family will find more amusing than
"cheese." A natural smile looks four times better than a fake one.
Our second category is...
Location Advice
for Photography Poses
Taking indoor family photography, is very different than outdoor family photograph (duh!). For INDOOR pictures...
1) Wide
Angle
You will tend to use the wide angle more often than your telephoto setting. Pay
particular attention to your "end people" (those farthest to the
right and the left in your viewfinder), and verify there is enough space in the
picture, so that if cropping is required, the end people don't have to lose a
limb.
2) The Flash
Flash
considerations are critical. Do not be outside your "flash
range." For example, if at ISO 100, your flash
can properly illuminate 12 feet, don't attempt a pose that requires anyone to
stand at 14 feet (unless, of course, it's evil cousin Ira who you want to
appear in darkness).
3) Plan "B"
If you need to be further away than your on-camera flash allows, here are 3
things you can try...
- Consider
purchasing an external flash unit for your camera.
- Increase the ISO setting (but not so much as to produce "noise")
- Physically move to a significantly brighter location.
4) Watch Your Background
If there are distracting (or competing) features, change the background.
The best photography pose in the world won't look right with a distracting
background. And finally...
5) Mirror, Mirror, on The Wall
If there are mirrors or reflective surfaces in the background and you can't
find a different location, only take the picture in such a way that the flash
is not perpendicular to the surface, but at an angle (unless you want
a nice photo of your flash).
Outdoor
photography addresses different issues...
6) The Sun
Avoid photographing in direct sunlight, or in mixed light and shade, especially
faces. Optimal lighting for almost any photography pose, results from a
slightly overcast sky.
7) Shade
When photographing in shade, use fill-flash
when necessary. And, really finally...
8) Beauty
If practical, take the picture at one of the beautiful natural settings near
you. Imagine the result of a creative photography pose captured in a stunning
environment. Can you say: "over the
mantle!"?
If you would like to receive lots of terrific
photography tips, subscribe to our FREE newsletter Get
the Picture? We hate spam, so your email address will only go to us!
You will also receive our free eBook The
“Must-have” Photography Checklist… What to Take Before You Leave the House
as our way of saying “thanks.”
That's it for general advice that applies to any photography
pose. To learn tips about specific photography poses, click on
appropriate photos below. This will open pages on the pose you're interested
in. (Note: "Photography poses," "Photography portraits,"
and "Photography pictures" are used synonymously; sorry, I bore
easily.)
Oh, Oh... SOAPBOX ALERT!
As you're hopefully aware by now, this site is NOT intended for professionals, but rather for beginning and enthusiast photographers who want better results. The reason it is mentioned now, is because we're going to be getting into photography poses, lighting, and positioning.
Therefore, if you begin to think: "But,
wouldn't this pose work better with a solid blue backdrop?" or "Shouldn't
you use three strobes for this photo, to reduce shadows and provide a softer
look?" you're probably correct.
However, 98.2844% of the people reading this
(I've done very precise research, as you could tell) not only don't know
what a strobe is, but don't care.
The advice on this site is meant to provide
you with the information you need to create, process, and store the best
quality photographs possible without professional equipment! You
don't need great equipment to take great photos; you just need to know
what to do with the equipment you already have.
So, if you're not ready to shell out $3,000
for a top notch digital SLR, you may want to check out What
is An Affordable Digital Camera?
OK, I'm down
from my soapbox...
As a reward for listening, help yourself to this Free software from Google:
|
|
Google provides excellent software, (including
photo-editing), for free. So,
if you want to Crop, sharpen, make pictures
pop. Get the free Google Pack. (Read the review on Picasa;
it's the photo-editing software in the Google Pack.) |
To take better family photography pictures, click on a category below. There's
even an eBook on How
to Take Amazing Baby Pictures...
Most Baby Pictures Are
CUTE
Make Your
Baby's Pictures...
REMARKABLE!
"Why are the baby photos I take just 'alright,'
when my baby is SO DARN ADORABLE?"
|
|
 Baby pictures are wonderful, heart-warming, and everybody
takes them. In fact, after the blessed event makes their grand
entrance, parents take hundreds and thousands of baby portraits in the 3 - 4
months following the birth.
Baby pictures are wonderful, heart-warming, and everybody
takes them. In fact, after the blessed event makes their grand
entrance, parents take hundreds and thousands of baby portraits in the 3 - 4
months following the birth.
Since you're going to take baby pictures
anyway, wouldn't you rather capture photographs that are spectacular?
Like most parents (and grandparents), you
have probably wondered: "Why are the pictures I take of my baby just
"alright," when my baby is ABSOLUTELY ADORABLE?
That's a question I get asked all the time.
The good news is, all it takes to improve the quality of your baby's pictures
is knowing how.
Before we get into some of the tips, let's discuss some key points about Baby
Photography 101.
First, (and
this is one of THE KEY principles of photography) -
Know Your Audience!
Set Your Expectations for Your Baby Pictures
No matter how much success you've had with cousin Freddy asking him to pose for the pie-eating contest, don't expect the same with baby portraits.
Why? Because babies don't care that you're
trying to snap the baby picture to show all your friends at work!
You can coerce, withhold diapers (although I definitely wouldn't
recommend that one), or shut down the college fund.
Your adorable little child couldn't care
less. If she or he doesn't want to pose for baby pictures, it's not happening!
Let's face it... they don't even know what
posing for baby pictures is!
A baby's ability to "pose" depends
upon their mobility and strength, and that translates into age. So, remember...
- 0 to 3 months: Like rag dolls. Except for laying down, they must be held for any pose.
- 3 to 6 months: Beginning to hold their head up on their own. Still very limited posing on their own (No point to gleefully skip up to little Amy proclaiming: "Dear, just slip into this ballerina outfit and stand over there - we're ready for your first formal baby pictures.")
- 6 to 9 months: Can kind of sit up on their own. You can pose them, but don't expect them to stay still.
Unless your
camera is on a relatively fast shutter speed (at least 1/250 second), don't
expect anything other than slightly blurred baby pictures.
If your
camera has a high speed sync for the flash, use it. Otherwise, the flash
of most digital cameras use 1/60th of a second for their flash.
- 9 to 12 months: Look out, mom and dad! You've just graduated to Baby Photography 102. Little Jimmy can now pull himself up and may be starting to walk
- 18 months: DEFCON 3--Your baby is walking!
 And now,
here's some tips on taking better baby pictures...
And now,
here's some tips on taking better baby pictures...
This is a baby picture taken literally on the
day of the baby's birth. Most day of pictures look like aliens from
space, or an extra from the movie Gremlins.
Here are a few suggestions so yours won't:
- Wait until the baby is clean and calm.
- Determine desired lighting. Ideally, try to not use a flash (the baby has already had enough trauma for the day).
- Determine if adjusting your camera's ISO setting provides sufficient light to take the portrait while hand-holding the camera. If not, use a bounce flash rather than direct, if possible. And, if all else fails, use a tripod in conjuncture with a long exposure.
- If you do use a flash, be aware of shadows, and check your LCD screen to see if any were created.
- Once you are all set up, then wait. Unlike regular portrait poses of children and adults, you have to wait for when the baby is ready. The picture above was captured after only 20 minutes (I was lucky). Patience is your greatest ally.
To capture "eyes open" baby
pictures takes patience, a steady hand (on the shutter button), and a little
luck. Also, don't be afraid to move around to check out all the camera angles.
|
|
See samples
of baby pictures other parents have taken. |
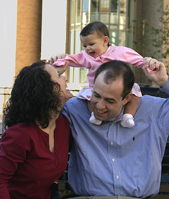
 As baby pictures go, this won't win any
prizes; however, it can serve to illustrate depth of
field very well. There will be numerous times when people will be holding
the baby. Sometimes you will want baby pictures with only the baby in them, and
sometimes not.
As baby pictures go, this won't win any
prizes; however, it can serve to illustrate depth of
field very well. There will be numerous times when people will be holding
the baby. Sometimes you will want baby pictures with only the baby in them, and
sometimes not.
To blur or keep the "background"
sharp (in this case, dad is the background), simply change the aperture. If
your camera has a "Program" mode, you can rotate one of the dials to
bring up different APERTURE/SHUTTER SPEED combinations.
Each combination will produce the proper
exposure, so why would you use different combinations? To blur the background,
focus only on the baby, and use as low an F-stop number as possible
(F/2.0 or F/2.8 would be ideal).
If you wanted to include dad in the baby pictures,
then still focus on the baby, but use as large an F-stop number as possible
(F/11.0 or F/13 would do the job).
 Experiment with full face and partial views of
dad. It's somewhat a personal preference, but I think baby pictures where the
baby partially blocks an out-of-focus dad look better.
Experiment with full face and partial views of
dad. It's somewhat a personal preference, but I think baby pictures where the
baby partially blocks an out-of-focus dad look better.
Once you've achieved that magical moment
where the baby is at their most photogenic, don't just be satisfied with
one shot like this one. Pan in closer so the baby's face fills the entire
field of view. If the baby is still grinning ear-to-ear, are we done?
You better not be! Change angles, move to her sides, stand up,
sit down, lay down and shoot upward.
The great thing about taking baby pictures is
that sometimes the baby will turn and follow your movements, and sometimes they
won't.
Bottom line, it doesn't matter!
Experiment... you can't always anticipate how the final picture is going to
turn out.
Remember my nagging about always having extra
memory cards and batteries available (preferably, rechargeable batteries)?
This is one of the reasons...
Flash pictures eat up power faster than
a Sumo wrestler at an all-you-can-eat buffet.
Oh, by the way, have I mentioned this before...
Carry
Extra Batteries!
Sorry, didn't mean to shout. But you do need
batteries to get all those terrific baby pictures. And, once you take a bunch
of really good ones, if you want to have your friends' jaws drop, create a collage with them (opens separate window). And,
relatives LOVE getting them as expensive-looking gifts, even if they don't cost
you too much.
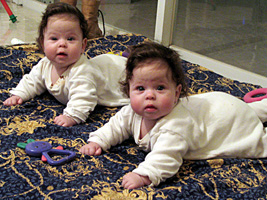
 Experiment with different perspectives
and angles. This is one where the baby is moving away from you, but still has
her face toward the camera. In this baby picture, notice that there is no
shadow from the flash.
Experiment with different perspectives
and angles. This is one where the baby is moving away from you, but still has
her face toward the camera. In this baby picture, notice that there is no
shadow from the flash.
One of the most important (and most easily
forgotten) tips when taking flash photography is to be very aware of what is behind
the subject. There are several benefits to noticing ALL the
surroundings, not just your subject.
When your subject is between the camera and a
wall (or other large object), the closer the subject (baby, in this case) is to
the background wall, the more chance you will produce a stronger shadow.
The other advantage to noticing your
surroundings is, which would you rather have? A baby picture sitting on your
desk with a smiling baby looking lovingly at you, while you can see the New
England Patriots on television in the background? Or, the same baby with a
non-distracting, and more importantly, non-competing object such as a
wall, behind them?
Compound this challenge with needing to be
quick, careful (especially around the baby), and observant; and you can
understand the difficulty in capturing good candid baby pictures!
|
|
Want to show the world how cute your baby is? |

 This is
about the closest you're going to get with posing an infant in front of a
"backdrop," without any help (as will be discussed later). It also gives
a whole new meaning to grumpy (but cute) baby
portraits.
This is
about the closest you're going to get with posing an infant in front of a
"backdrop," without any help (as will be discussed later). It also gives
a whole new meaning to grumpy (but cute) baby
portraits.
Since a "0-3 month old" infant can
only safely be left unattended while laying down, this is how to make the best
of the situation.
Use a nicely-colored towel or blanket
(experiment with different colors - both dark and light) and cover a flat or
pillow-layered area. THEN WAIT.
Feel free to have the parents dangle toys, make funny noises, and call the
baby's name (preferably behind you, so they are out of the picture; and, if
successful, the baby will turn toward you and the camera).
Realize though, at this age, the parents'
antics will be more for your amusement than for truly getting baby's
attention! Baby pictures like this take lots of patience.
If your baby is a heavy sleeper, here's an idea...
Prepare a prop such as a large flat flower
basket, place a small pillow in the middle, surround the perimeter with a
wreath of flowers, and then place the baby on the pillow.
I guarantee this will be one of the baby
pictures that will be a "keeper." Also try this approach when
the baby is all dressed up in their Sunday-best. Just be sure to avoid
destructive shadows, such as from the basket handle.
 There's several things to note in this type
of baby picture (besides the fact that baby is sharing the spotlight). First,
there is activity. Let me first say that there's nothing wrong
with a family portrait having everyone "doing nothing."
There's several things to note in this type
of baby picture (besides the fact that baby is sharing the spotlight). First,
there is activity. Let me first say that there's nothing wrong
with a family portrait having everyone "doing nothing."
However, experiment with activity, be ready
for those special action baby pictures when they presents
themselves, and gently squeeze the
shutter button.
Why gently? Because if you jerk it quickly in
an attempt to capture a particular instant, you'll likely move the camera just
enough to blur the baby picture. This is one of the main reasons I recommend
getting the following relatively inexpensive accessories...
|
|
The first is a tripod.
Which type of tripod should be based on your shooting style, typical subjects,
camera weight, and budget. Note that many inexpensive table or floor standing
tripods can be purchased for between $20 and $59.
The other seldom-discussed accessory for not
just baby portraits, but for all photography, is a remote shutter release.
This is typically a plastic-housed shutter button that is connected via a 2-4
foot cord to an input on your camera.
By placing the camera on a tripod, and
attaching the remote shutter release to the camera, you can remotely focus and
release the shutter on the camera without risk of vibration that would
result in a blurred shot.
OK, back to the subject of outside
baby pictures. Another key point is that you need a completely different thought
process since you are OUTSIDE.
A flash is not required, unless as fill-flash.
(Click here to review the points on taking baby pictures while OUTSIDE.)
You will also notice that part of your background will be in the photograph.
That can be altered by cropping, but generally it's OK, if certain
considerations are remembered...
- Don't have the background overpower your subjects (or your wonderful baby portraits will turn into wonderful architectural shots "with some people in front").
- Avoid backgrounds that are particularly bright, have glass, or shiny surfaces.
- If your camera permits it, use center weighted-average metering and focus on the people.
If you use evaluative
metering, your main subjects may turn out too light or dark. If you have to
use this type of metering, move closer to the baby (or use telephoto if your
camera has it), focus and meter on the subject only (not the
background) and use the auto "exposure lock" feature.
This will lock the metering in for your baby
portraits. Then recompose and shoot.
 Little Christa is 3 months old here. "Hey,
wait a minute! You told me babies couldn't sit up on their own until around 6
months!! Are you showing trick baby pictures now?" Terrific - you
remembered!
Little Christa is 3 months old here. "Hey,
wait a minute! You told me babies couldn't sit up on their own until around 6
months!! Are you showing trick baby pictures now?" Terrific - you
remembered!
Here's the tip... check
out the backdrop. Can you tell what's behind it? Here's a hint - mommy is! Mom is holding her baby through the
blanket (a.k.a. "backdrop"), thus accomplishing 2 critical
objectives.
First, the baby is secure and safe from
falling over (and well on her way to adding to her collection of adorable baby
pictures). And second, the baby is perfectly posed. I can just hear you saying:
"But where's the shadow?"
There are several ways to avoid shadows. This is just one sample photo
demonstrating the advantage of not using a flash. And here's a few tips
to accomplish that:
 Try increasing the ISO high
enough to take baby portraits without a flash, but not so high that the
"digital noise" will ruin the photograph.
Try increasing the ISO high
enough to take baby portraits without a flash, but not so high that the
"digital noise" will ruin the photograph.
The use of a
tripod is strongly recommended on shots longer than 1/200
of a second (example: 1/60, 1/100, 1/30).
![]()
How
to Take Cute Pictures of Your Baby
Free
3-Part Series: "Taking Better Pictures of Your Baby"
Create
Your Baby's Own Web Page (and Find More Tips For Taking Better Baby Photos Too)
Article:
Baby Book Scrap-booking for New Moms
eBook
on "How to Take Stunning Photos of Your Own Baby"
FAMILY
PORTRAIT POSES
Family
Portrait Poses are all about
Family, Friends, & Memories
"Thanks for showing so many family portrait
poses.
Seeing yours provided me with a boatload of new ideas."
|
|
 Triple the impact your family portrait
poses will have by learning easy and practical photography poses and
techniques. In "Small Family Group Poses" (as opposed to Large
Family Group Poses), we will focus on groups between 2 and 5.
Triple the impact your family portrait
poses will have by learning easy and practical photography poses and
techniques. In "Small Family Group Poses" (as opposed to Large
Family Group Poses), we will focus on groups between 2 and 5.
Your group can consist of adults, children,
babies,
and pets,
as long as the total doesn't exceed five in total.
Let's get into some tips on family portrait
poses specifically for YOUR FAMILY. We will address group pictures taken inside
and outside; and discuss the portrait techniques applicable to each.
Family
portraits are not that much different than traditional group pictures (except
there's usually a lot more yelling).
 How
many pictures have you seen where a couple is kissing? Have you noticed
anything particularly unique or noteworthy about them? Bottom line, would you
want any of them turned into a framed family portrait?
How
many pictures have you seen where a couple is kissing? Have you noticed
anything particularly unique or noteworthy about them? Bottom line, would you
want any of them turned into a framed family portrait?
If you can capture the magic... that elusive
and hard to pin down chemistry between the couple, then you almost can't
ruin the picture. For example, how many "different"
photographic things took place in this composition?
To start with, it's not a typical half or
three quarter portrait. This family portrait pose is an extreme close-up. Also,
part of the man's head is "cut off" for dramatic effect. No, it
wasn't a cropping mistake.
That's one of the great things about
photography... there are guidelines, but it is also a creative
art, where you are always free to push the envelope; especially
with family portrait poses.
Notice anything else? Normally couples face
the camera. But this time not only aren't they looking at the camera, but they
are also not looking at each other, or even facing the same direction!
Plenty of photographic instructors will tell
you to always have your subjects look at the camera. That is a "rule"
that should only be followed when it makes sense.
For this family portrait pose, it doesn't.
How do we know? We only have to look at the photograph to see that for this
couple in this family portrait pose THIS
PICTURE "WORKS." And in photography, that is THE TRUE
BOTTOM LINE.
 One of the rarest AND most
memorable family portrait poses involves a parent and baby.
Unlike the type of Parent & Child photographs typically done at Sears and
J.C. Penny, this style conveys a different impression.
One of the rarest AND most
memorable family portrait poses involves a parent and baby.
Unlike the type of Parent & Child photographs typically done at Sears and
J.C. Penny, this style conveys a different impression.
Here are a few things to keep in mind when
capturing family portrait poses that produce a profound emotion.
In this particular photo:
- The dad is asleep while the baby is not. Generally, the easiest approach to this type of portrait is to first pose the parent, then wait for the baby to fall asleep.
- This type of shot begs using unique camera angles. Try numerous compositions and angles, once the subjects are set.
- Probably the most challenging part (although it is also the most creative and fun) is to not automatically take the kind of shots that you are used to taking. Think about doing things for the first time; observes scenes that have not interested you in the past!
If you're going to take family portrait poses of couples, you may find
them both challenging and easy. 9 out of 10 times, when you go to photograph a
couple, they won't "need" posing (in their mind, anyway).
They will automatically put their arms around
each other, hold hands, or move their heads together. After enough
"standard wedding poses," they automatically assume the position.
You might think: "What's wrong with that? The pressure's
off me, then." The problem is that those portrait poses are usually
going to wind up looking lifeless, boring, and
"typical." But the very worst thing -- they don't look
natural!
Anyone can take family portrait poses that
look like cardboard figures. But, you can to do so much better than that.
Rather than just let the couple leap into their standard couples pose, gently give them directions.
Think about it - how often have you noticed
people taking portraits of others where they actually gave them directions to
create a better pose? That is very rare, AND it is precisely what will
dramatically improve your family portrait poses.
Here are some very simple examples:
- "Jim,
how about if you get behind Marge and put your arm loosely around her
neck?"
- "Hey
guys, forget I'm here, look into each other's eyes, and then think back to
______."
(Depending on the type of pose desired; remind them of a funny, sensitive, emotional, or loving event in their life.)
- Suggest various position changes such as one person standing and one sitting, looking at directions other than directly at the camera, or using your environment (tables, statues, columns, trees, boulders, etc.).
Once you have them posed in a comfortable
position, you can fine tune it with slight adjustments of jewelry, head, and
hand positions.
 So, what do you notice about this family
portrait pose? Yes, it's outside (or in a really big house with a tree
inside it). What else do you notice?
So, what do you notice about this family
portrait pose? Yes, it's outside (or in a really big house with a tree
inside it). What else do you notice?
Is it centered? Sort of? What do you think of
the tree? Do you feel it adds or detracts from the shot?" (You are the one
who gets to decide, you know.) And, what's the deal with the out-of-focus woman
in the background?
OK, let's tackle these one at a time in
"Small Family Portrait Poses 201"...
It's time to talk about "composition."
The challenge with composition is that while photography is both art &
science, "composition" remains firmly in the "art" camp.
In photography, symmetry is not necessarily a
preferred result. Although most group pictures have the group nicely centered,
you can take more creative liberties with smaller groups (say 2 or 3 people).
Here's another word for "centered." It's boring.
Refer back to the photo above, ignoring the
person in the background for the moment. Of course the portrait could have been
taken using the same pose, but without the tree. What do you think... better or
worse?
One nice thing about photography is that
every photo is subjective. It's not like math where no matter how much you want
2+2 to equal 5, it just doesn't. So, back to the tree... do you like it better
in or out of the picture? Personally, I feel it adds an element of interest and
balance to the photo. And, that's essentially the same reason for the grassy
area on the left.
The woman was in the background because the
wrong F-stop was used. Basic rule of thumb: If you want to have the
subjects in the foreground AND the background to be in focus, use a
smaller aperture (higher F-stop) such as F/11 through F/22.
For example, if you're taking family portrait
poses in front of the White House, you would probably also like the White House
to be in focus, rather than be blurred out. That's when you use a small
aperture.
If, however, you were taking several family
portrait poses in front of a row of ugly buildings, you would probably want to blur
the background as much as possible. In this case, you would use as LARGE an
aperture (small F-stop number) as possible.
Back to the sample photo. The F-stop used was
F/32, so even though the background woman was around 150 feet away, you could
still sort of tell she's there. Had an F-stop of 4 or 5.6 been used, the woman
would be a non-distracting blur.
 Here is the
final photograph used with the same family portrait pose. To achieve it, we
used a highly coveted, secret photography trick to eliminate the background
distractions... we waited until the woman moved out of the frame!
Here is the
final photograph used with the same family portrait pose. To achieve it, we
used a highly coveted, secret photography trick to eliminate the background
distractions... we waited until the woman moved out of the frame!
As an alternative, we could have repositioned
the camera about 15 degrees to the left, thus eliminating the background woman
from the field of view.
The main
point is this: Think about the details BEFORE
taking important shots of family portrait poses. As long as your
objective is to take the best possible family portrait poses, remember the
details.
![]()
Eliminate Blinking From Your Photographs
Has this ever happened to you? You take a
sensational group photo, only to later realize that it was RUINED by someone who blinked, looked away,
scratched, sneezed, or somehow moved just as you took the picture?
It's happened to me more times than I can
recall, so imagine my excitement when I discovered a way to eliminate this problem completely, EVERY SINGLE TIME!
![]()
Prevent Blinking BEFORE
the Photo
or Eliminate It AFTER the Picture
How? We provide the Ultimate 1 - 2 Punch:
- Software for your PC that was custom-developed to eliminate blinking (or looking away, scratching, sneezing, or moving) that has already occurred in your photo
- A Comprehensive Photography Guide that contains:
- Tutorials on What You Need To Do, to Prevent Blinking BEFORE taking the photo
- Tutorials on How to Use the Software to Eliminate Any Blinking that Made it Into Your Photo
- Photographic Samples, including "Before" and "After" pictures
- Plus, much more
AND THE BEST PART... It's very simple to use, even if you have NEVER
EDITED AN IMAGE BEFORE. The software makes the process almost automatic.
If you wish to be notified when the Blink
Eradicator System is available, simply fill out this 14 second form. There will
be absolutely no obligation to purchase anything, and your email will only be
used to notify you of availability.
Please note that the software will only run on Windows XP. (If you are not
using Windows XP, you may want to look at The
No-Sweat Approach to Taking Great Group Photos as an alternative for
improving your group photos.)
Bottom of Form
![]()
 Family portrait poses including mother
and daughter are always special. Of course, the same can be said for either parent
and child.
Family portrait poses including mother
and daughter are always special. Of course, the same can be said for either parent
and child.
This particular example falling under the
heading of "dramatic family portrait poses" is not only stunning but
easy to take. The simplest way to achieve family portrait poses like this one
is to use one of the following:
- The "Portrait mode" (or equivalent) setting on your digital camera
- The telephoto setting to fill your viewfinder with the final desired image.
- Physically move closer to fill your viewfinder.
If indoors (with lighting an issue), the challenge is how to be close enough to fill the frame without producing any "hot spots" from the flash.
This a good time to use a bounce-flash (from
an external flash unit).
If that is not available, move as far as
possible from the subjects (while still being within the range of your
on-camera flash), and let your subjects fill the picture frame.
If taking this type of group pictures outside,
it's best to take it in other-than-direct-sunlight. Find a solid color
background (a building wall will do), and wait for a little cloud cover to
happen. Overcast sky? Even better.
Optional themes for family portrait poses
like this include:
- Forehead-to-forehead
- Nose-to-nose, but not smiling
- Very close together, but not touching. One person a few inches higher-looking down; other person lower-looking up
- Any portrait pose above, with one subject softly placing their open hands on the cheeks of the other
This
dramatic effect is accomplished very easily by cropping the original
photograph. It is likely that whatever image-editing software that came with
your digital camera allows for cropping.
The good news is that "cropping" is
often the easiest tool in your software's tool box. The other good news is that
there are outstanding free software packages available (including the
photo-editing) through Google.
There are excellent easy-to-use packages
available through Google that will Crop, sharpen, make pictures pop.
Get the free Google Pack.Of course, this particular family portrait pose is
the same as the one above. By moving in even closer when the picture is
originally taken, you can achieve the same end result without cropping.
Please note two things. First - you may have
to use your "Macro" setting to achieve the shot. And second, instead
of taking the picture horizontally, you need to hold the camera vertically to
capture the desired proportions in this wonderful mother and child family
portrait pose.
 After several family portrait poses
without props, it's a nice addition to include one if it fits. If you're
creative enough, you can almost make any prop work in group pictures.
After several family portrait poses
without props, it's a nice addition to include one if it fits. If you're
creative enough, you can almost make any prop work in group pictures.
Rather than use the couch or love seat, which
would have severely limited posing options, we used a weight-lifting bench as a
unique focal point. In addition, the fireplace screen is a good background
"prop," that forms a partial photographic frame, as well as making
the fireplace more recognizable.
This group
picture required all three family members to be positioned about two feet off
the ground. That means the camera better not be higher than three feet maximum.
Why? Because for most family portrait poses, the camera needs to be at eye-level with the subjects. If not, the
perspective and composition will generally not look very good.
 Although
not visible, this family was posing for their group picture on a boulder. All
three heads are at different distances from the camera. What is truly unique
about this family portrait pose is that two of the three heads are partially
blocked, adding a slight spontaneous feel to the picture.
Although
not visible, this family was posing for their group picture on a boulder. All
three heads are at different distances from the camera. What is truly unique
about this family portrait pose is that two of the three heads are partially
blocked, adding a slight spontaneous feel to the picture.
Important in
this pose is to use as high an F-stop number as allowable on your camera. By
doing that, you will insure that all three subjects are in focus, although at
different distances from the camera.
![]()
Large Group Poses (more than 5)
What Are Spectacular Portrait Poses
And How Do We Capture Them?
"Capturing outstanding portrait poses had always
eluded me;
until I read your advice. Now I've got two."
|
|
 Taking true "portraits" is not as
easy as you might first think. Well, actually that's not entirely true.
Capturing really good portraits isn't easy; taking a picture of
someone and calling it a portrait is very simple.
Taking true "portraits" is not as
easy as you might first think. Well, actually that's not entirely true.
Capturing really good portraits isn't easy; taking a picture of
someone and calling it a portrait is very simple.
Here are a few key factors that should be
addressed if your goal is to create the "really good" variety.
·
Equipment
·
Location
·
Capturing
Their Heart and Soul
Equipment
There are only two pieces of equipment that
you need to consider... the camera and the lens. And for those of us who own a point
and shoot camera, it really only means one thing.
Camera
From a technical perspective, point and shoot cameras are not going to take outstanding portraits. However, before you get discouraged, there are several things that can be done to improve whatever photographs you do take. These points will be covered in the "Capturing Their Heart and Soul" section below.
If you have a digital SLR, there is more
flexibility in producing a better portrait. Depth
of field is a significant factor when taking portrait poses. With
portraits and macro work, the depth-of-field is one of the most critical
factors to consider.
When doing portraits, you want as
little depth of field as you can get. Because of this reason, a full
frame digital camera is preferable to one with a smaller sensor because of
the increased depth of field.
Many less expensive digital SLR's have a
smaller sensor because it is less expensive and in most cases,
it's not an issue. However, in this particular situation, it is.
Remember These KEY
Rules:
The larger the aperture, the more OUT-OF-FOCUS is the
background.
The smaller the aperture, the more IN-FOCUS is the background.
The only slightly confusing point is this - a
large aperture is equal to a small F-stop number (F/2 for example); while a
small aperture is equal to a large F-stop number (F/22 for example).
Lenses
|
|
There are two schools of thought for what type of portrait looks best: one that is sharp or one that shows a "softness" (or fuzziness) in the final image.
Because it really comes down to your
photographic preference, we are not going to take sides; instead, we will cover
both.
According to beauty experts, the most
unflattering part of the human face is the nose. The challenge then becomes how
do you use a shallow depth of field lens that keeps the entire face in focus without
emphasizing the nose?
The answer is to frame your subject, and then
move as far away from them as you can while still having their face fill most
of the frame. It basically comes down to numbers.
If you are standing a few feet away from your
subject, the "zone of sharpness" is relatively small.
We run into a problem when the
"zone" is less than the distance from the tip of the nose to the
eyes. For example, if you are shooting portrait poses from a distance of 4 feet
from your subject, let's say the zone of sharpness of the lens you're using is
one inch.
If the distance from the tip of their nose to
their eyes is 1 1/2 inches, then some part of their face will not be as sharp
as you want.
On the other hand, if you're shooting from 15
feet away, the zone of sharpness may be 3 inches.
In that case, since the distance from their
nose to eyes is unchanged, what this does is guarantee that all parts of their
face will be sharp (because it is within the zone of sharpness).
 This is fine
for people who believe portrait poses should be sharp. For photographers who
want a certain "softness" in their portrait poses like this one, they
can approach the situation differently.
This is fine
for people who believe portrait poses should be sharp. For photographers who
want a certain "softness" in their portrait poses like this one, they
can approach the situation differently.
There are filters made to produce a certain
fuzziness to pictures, by design. There are also flash attachments that can
cause light to be diffused and therefore produce a gauze-like or angelic look
to portraits. These type of effects can also be created by using photo-editing
software in post-production.
Location
One of the most important things to remember
when doing portrait poses, is to avoid using a
conventional flash, if at all possible. The reflected light will
simply appear too harsh most of the time. Since most of us don't have a
professional studio, here are some other ways to produce quality results.
When doing portrait poses, the two most
important elements at your location are lighting and background.
Lighting
Ideally, you would like to
be able to totally control lighting; how much there is, what direction it is
coming from, multiple sources, and soft reflections.
Since we don't have a complete studio at our
disposal we need to make the most of the lighting that we do have.
One way to do this is to position your
subject near a window or other source of natural light.
Since you cannot change the direction and
intensity of the lighting (as you could in a studio environment), the only
remaining option is to reposition your subject relative to the lighting that
does exist.
Set your camera's controls to use a wide aperture and slow shutter speed.
Because of this, you will definitely need a tripod.
If you don't have any sources of natural light as described, you can usually
find good lighting conditions in certain large government or academic
buildings.
Notice which portrait poses produce too many
shadows or too few. Taking outside portrait poses can be more difficult than
doing them indoors. Bright overhead sunlight typically produces unsatisfactory
lighting conditions by making your subjects appear too harsh; in addition to
creating too many shadows under the eyes.
If your subject is wearing a hat, it is very
likely that shadows will hide their face. In this case, it is important to use fill
flash. If contemplating doing portrait poses outside, the best time
to do it is when it is overcast.
Background
 There is no such thing as the perfect
background. Basically, it comes down to what you consider to be an acceptable
background for the particular portrait poses you're working with.
There is no such thing as the perfect
background. Basically, it comes down to what you consider to be an acceptable
background for the particular portrait poses you're working with.
Sometimes you will want a solid-colored
background, while other times you will be quite happy with very blurry
nondescript blobs of color filling the space behind your subject.
This is an example of a decidedly not blurry
background. Do you believe it would be better more or less out of focus, or
does it establish part of the overall "story?"
There is also nothing wrong with a slightly
out-of-focus background which adds to the overall story or effect of the
photograph.
When you work with portrait poses, you can
create whatever impact you want; from a mesmerizing black-and-white to a color
portrait that captures the total whimsy of the subject.
Capturing
Their Heart and Soul
This is the area which is most difficult to describe. It is much easier to show examples and then explain what qualities are conveyed. With that said, there are two guidelines that are useful when trying to determine the best portrait poses to use.
- Fill as much of the frame as possible with the subject's face.
 If the portrait pose captures a
memorable emotion, activity, or story; it is much less important to fill
the frame with the subject's face.
If the portrait pose captures a
memorable emotion, activity, or story; it is much less important to fill
the frame with the subject's face.
In fact,
depending on the significance of the event and how it relates to the subject,
it may not even be necessary to show the subject's entire face with any
clarity.
Portrait poses which grab the viewer while
capturing the heart and soul of the subject are rare because as of what's
required of the photographer. Unless you are a photographer on assignment or
you are doing a labor of love, most photographers are reluctant to spend the
significant amount of time with the subject that is often required to truly
capture their essence with a camera.
Like any other goal, striving towards it is
often its own reward. And, once you do achieve the goal, portrait photography
will never be the same to you again.
![]()
Simple Photography Portrait Tips that Everyone Can Apply
How
to Capture Spectacular Portrait Poses
How
to Create Effective Portrait Backgrounds